
How to create a 2 week social media content schedule in less than 4 hours

One of the biggest struggles for pretty much any business owner is how do you balance social media with ALL the other things in your business. There’s no doubt it can be a huge time suck, but it’s also one of the easiest (and most accessible) ways to find new customers.
How can you make sure you get the biggest bang for your buck when you spend time on social media? Answer: make a kick ass social media content schedule so that you can create as much content in advance in as little time as possible, and that’s exactly what I’m going to show you today.
Batching is key for this, as if you’re always creating new content on the fly, you might not always be inspired in that moment. Not knowing what to write or post can take so much longer than having everything prepared ahead of time.
First off, I want you to know that you don’t have to do all of these things, it looks like a lot … because it is! I really wanted to show you that when you’re strategic and intentional about your social media content schedule, it truly is possible to create a few weeks worth in a much shorter amount of time than usual.
Secondly, the foundation of this entire strategy is that you’ve already written a value packed, educational blog post that solves a problem for your ideal client.
Why blog posts?
I wrote ALL about my top 3 reasons over here, and even though that article is a few years old, it’s still 100% true.
You can get found easier on Google and other search engines, which is like finding free customers who are looking for your products and services right now.
You can spend time creating content ONCE that will live on forever, but can re-used over and over again on social media with my strategy below.
You can use blog posts to actually sell your products, programs, and services. This is key since we’re not creating content for the sake of it, but to actually grow your business.
When you spend so much time writing a blog post, don’t let that investment go to waste! You shouldn’t just be sharing it once and then forgetting it ever existed, but reminding people on social media, who have likely never seen your older blog posts, once or twice a month.
And remember that organic reach on social media is only 2% on Facebook and 20% on Instagram, meaning that there’s at least a 4 out of 5 chance that someone isn’t going to see your posts and likely won’t even know that you’re reusing content. In fact, some people need to see the same thing more than once before they take action on it, so you might even be increasing your chances that someone will become a paying customer (which is what this is all about!).
Once you have a blog post, here’s what you’re going to do with it to create a 2 week social media content schedule in less than 4 hours:
#1 Pinterest Pins
Time required: 30 minutes
There are so many business owners who aren’t using Pinterest for their businesses, but take a look at all the recipes, tips, products (especially for decorating and renovating!) there, and you’ll realize that it’s a gold mine for potential new customers.
I used to only make one Pinterest pin for each one of my blog posts, until I started working with a Pinterest expert who wanted multiple pins for each one.
When you think about it, this totally makes sense. The design that appeals to one person might not appeal to another, as well as different headlines.
What you’re going to do is create 3 different Pinterest pin templates using Canva or Photoshop. I show my students how to do this in my course so that your pins already match your branding and business colours.
There are tons of free Pinterest templates in Canva that are absolutely beautiful and will only take minutes for you to switch out the image, adjust the colours, and add your own headline.
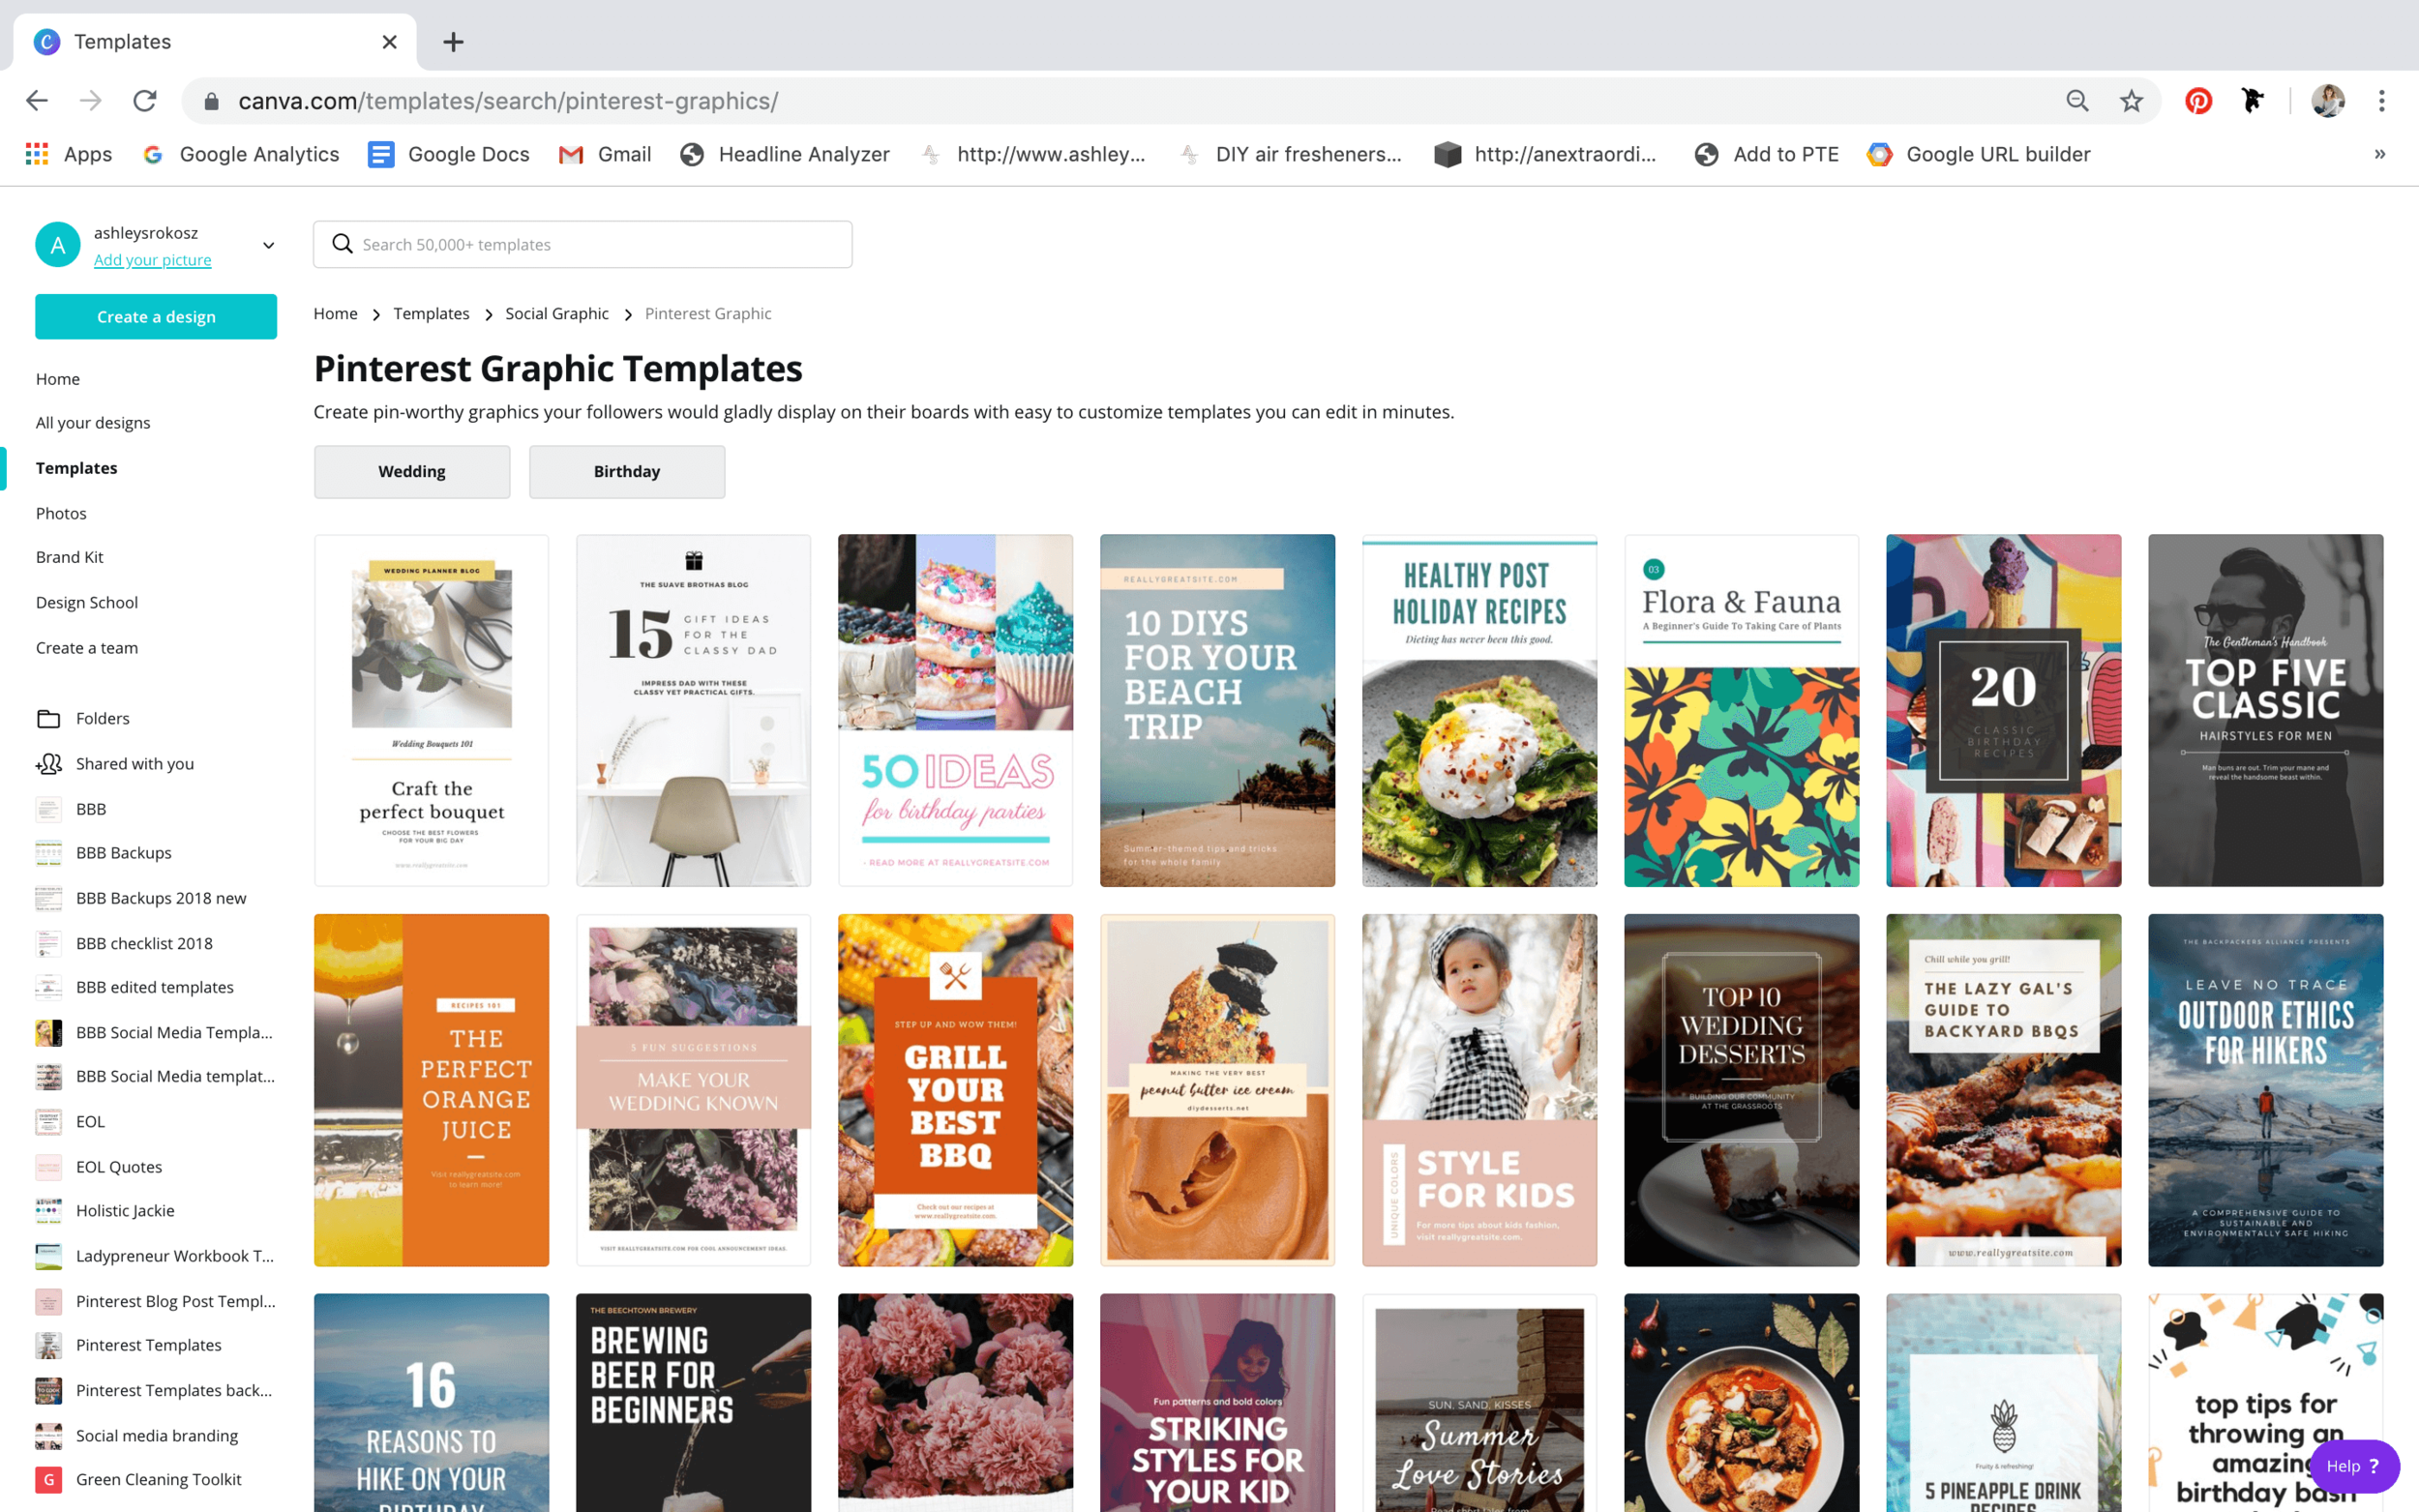
Alternatively, you could also buy Pinterest pin templates on Creative Market for as little as $15 US, which would save HOURS of time.
You would create 3 pins for your blog post by switching out the stock photos to your own photos (or other free stock photos that match your branding), and create 3 different headlines.
When you’re using templates, this should only take 20 minutes.
You can then use a Pinterest scheduling tool such as Tailwind, Planoly, or Later, and publish each pin every 4 days or so apart so that they’re dripped out over 2 weeks.
Pinterest is similar to Instagram in that if you drip content out over time, rather than upload everything at once, it helps with organic engagement.
Pre-scheduling your 3 posts should only take another 10 minutes or so.
I personally use the Tailwind app for Pinterest, as it includes other features on the paid version such as SmartLoop and Tailwind Tribes that you can’t get on Planoly or Later (more on what I do use those two apps for below).
#2 Instagram + Facebook Posts
Time required: 60 minutes
I don’t know about you, but I find creating and posting new Instagram content takes FOREVER … which is why I pre-write and schedule all my social media content.
Instagram stories are more organic and in the moment (more on that below), but for posts? I batch that sh!t and save myself hours of time.
Bonus: I can preplan my feed and make sure it looks amazing before I even post anything, which makes this Type-A, design obsessed control freak so happy.
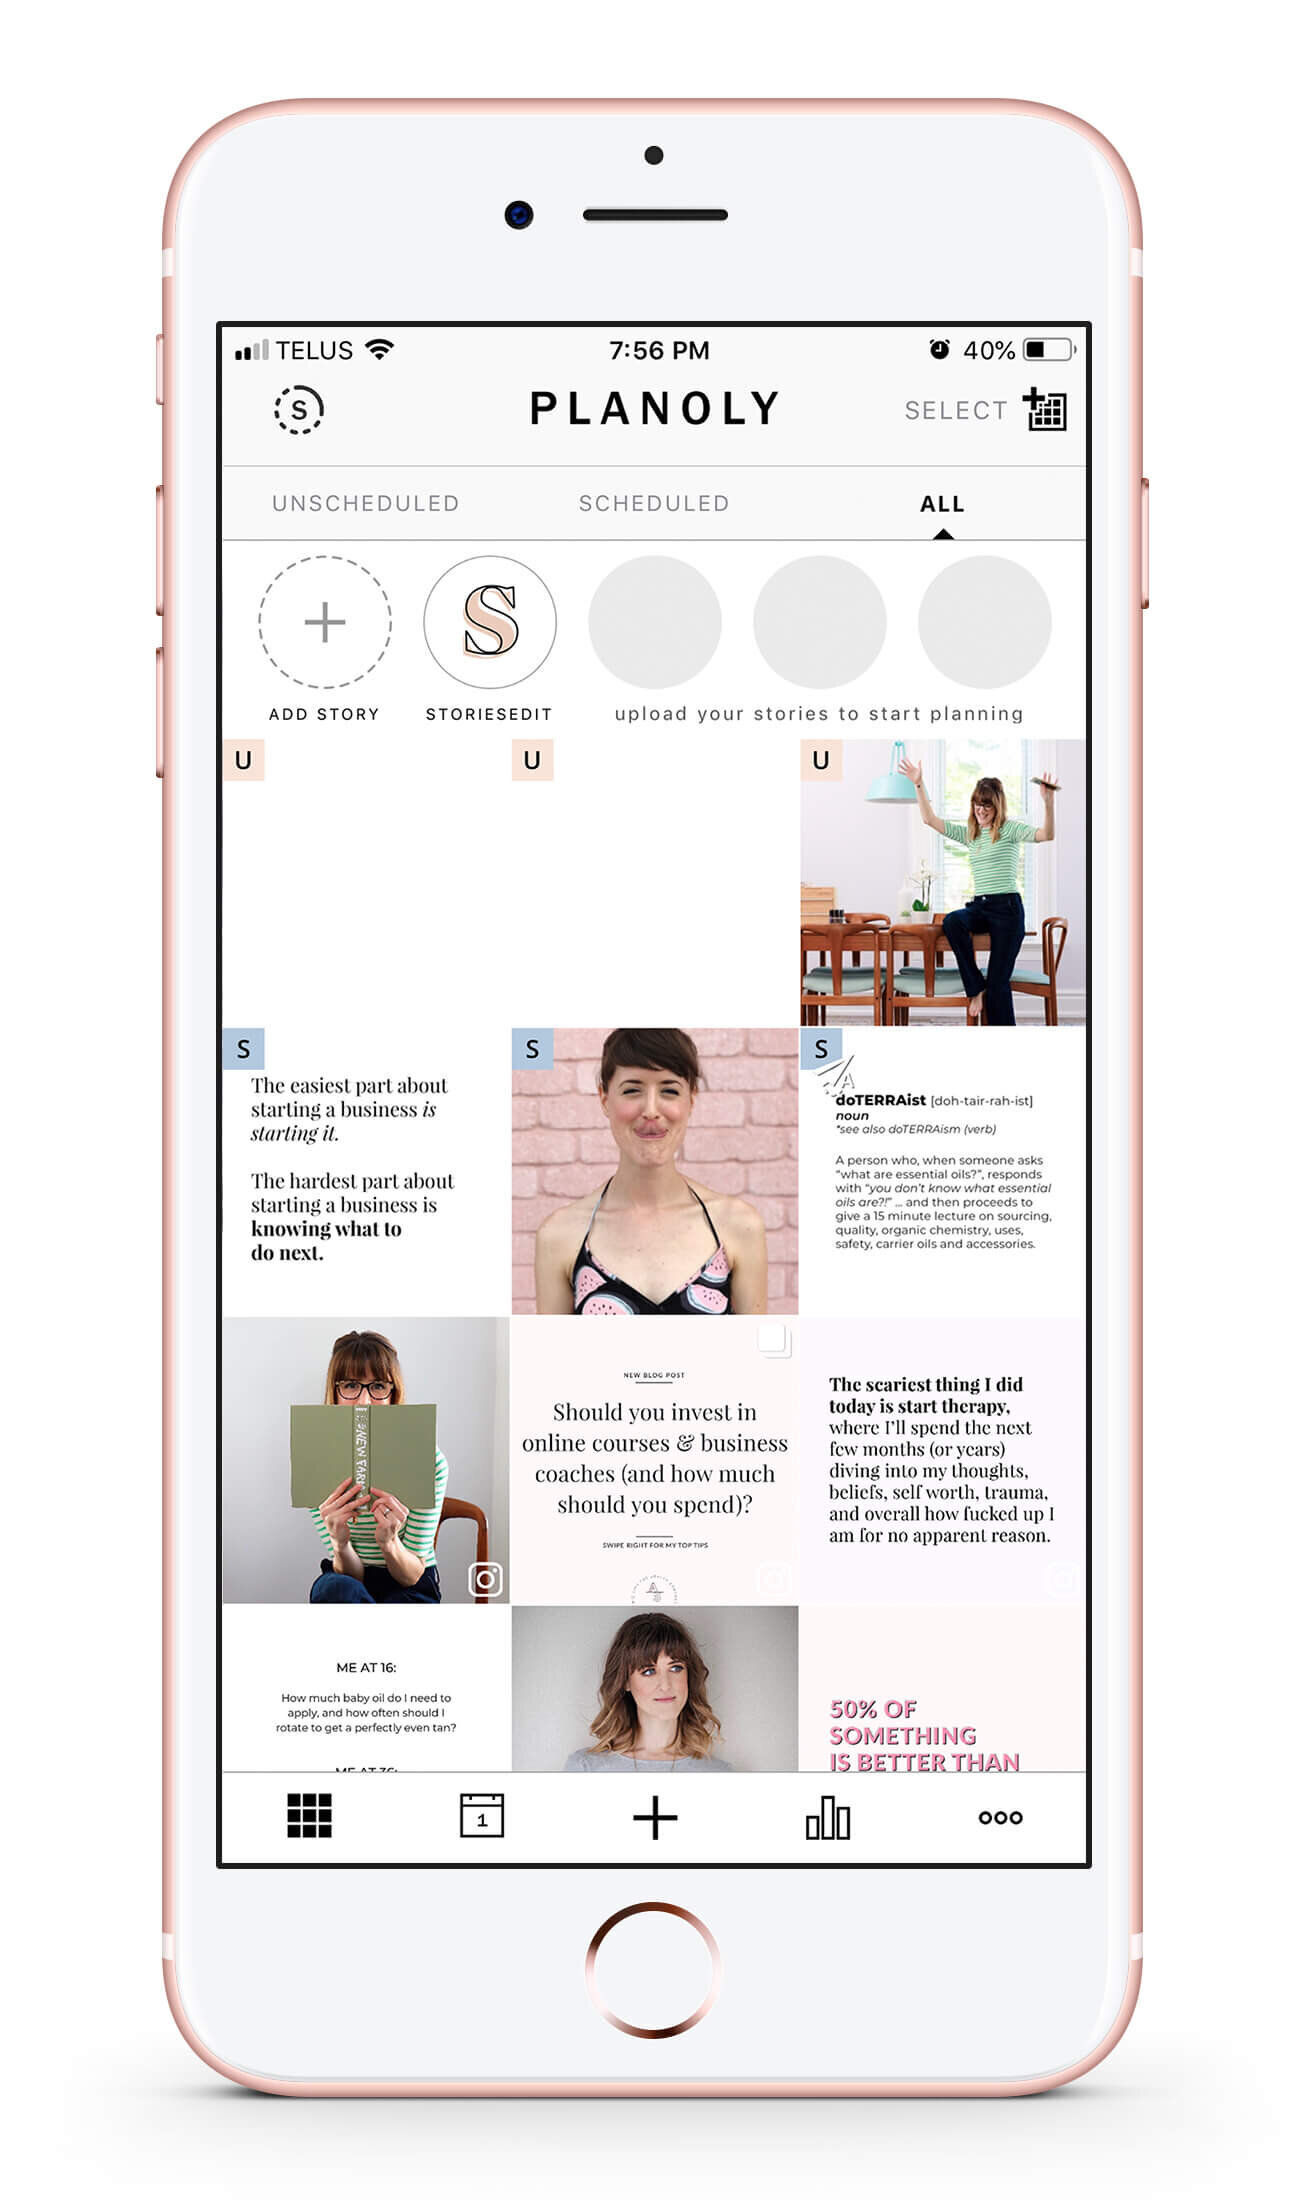
Personally, I use the Planoly app to upload my images, rearrange them in my grid to make them look perfect (Hi, I’m Ashley, and I’m a perfectionist), write my captions, group all my hashtags, and schedule (or autopost) my posts. You could also use the Later app, which is very similar (I might move to Later in the next few months).
With the free version of Planoly, you can upload, rearrange, and schedule 30 images per month, while with the free version of Later you can upload unlimited images to your library, but only schedule 30 posts per month. Neither free version allows you to schedule video or carousel posts (posts with more than one image).
If you use the paid versions of Planoly, you can also autopost your hashtags as the first comment, which is what I do to keep the caption looking cleaner. I use the solo plan, which costs $9 US per month, which also allows me to see the best times for posting.
For Facebook, I simply reuse my Instagram posts. With Facebook organic reach being so low (averaging only 2%), I don’t see the value of spending a ton of time creating different content.
Keep in mind if you’re sharing posts from Instagram to Facebook to edit the caption to reflect that you don’t need to “click the link in the bio” from Instagram, but you can put your link directly in the caption.
I go into the Instagram post like I’m editing it, and I copy the entire caption. I then go into Facebook, create a new post, paste the caption, edit the part about clicking the link in the bio for an actual direct link, and upload the same picture.
Here’s my strategy for making 6 separate Instagram and Facebook posts out of one blog post:
Post 1 - a few days before you write the blog post, put up a personal picture with a story of how you were struggling with the topic of your blog post, and the direct question “what is your #1 struggle with X?”. Let them know that you’re writing a blog post on this subject and you’ll share it when you’re done.
Post 2 - share an announcement that you wrote a new blog post and tell people what action to take. I like doing this with a carousel post, because a swipe right to get more information counts as engagement, which tells Instagram it’s a useful post and can help boost organic reach.
Here are 3 examples of posts like this:
Again, if you set up a template for this, it won’t take much time at all (5 minutes per image).
Your caption can be copied and pasted directly from the introduction of your blog post (see how I did this by clicking through my Instagram post above, it’s copied directly from this blog post here).
The post above of mine resulted in 14 website clicks and 2 new followers.
Post 3 - a high impact quote directly from your blog post, an inflammatory quote or viewpoint, a funny anecdote, or a graph/chart. This is pretty self explanatory, and quotes are highly sharable right now to Instagram stories if it’s especially entertaining or powerful.
Again, use a template, and include a call to action in the post caption.
I made this image for free in Canva, it took about 10 minutes, and it was shared by 20 people to their own stories, reached 7,623 people (90% weren’t following me) and I got 11 new followers and 14 clicks to my website.
Again, this next image took about 5 minutes, and it was shared by 33 people to their own stories, reached 17,489 people (96% weren’t following me), and I got 8 new followers and 15 clicks to my website.
Captions for these types of quotes don’t have to be long or involved, they can even be something short like “Share if you agree!” or “Guilty as charged”, then a call to action for them to read the blog post on your website.
Post 4 - put up a personal picture with a behind the scenes struggle you had related to the blog post. Really share what you were feeling, the more vulnerable, the better.
Include a P.S. that you finally figured out a system/solution, and that they can click the link in the profile and read your blog post to learn more.
Post 5 - another inflammatory or funny quote image OR you could use some personal photography or a stock image. This time the caption could break down just one part of the blog, you could even copy and paste directly from that section of your blog post.
You could also add additional information or a secret hack that wasn’t shared in the post, or share a beautiful picture of a recipe that was at the end of the blog post. This caption doesn’t necessarily need to have a call to action.
Post 6 - IGTV video, keep reading to see how to use this amazing feature that hardly anyone is taking advantage of!
I generally only post 3 times a week, so these 6 posts would cover me for 2 weeks of Instagram content, which takes up the most time for me!
#3 Instagram Stories
Time required: 30 minutes
If you’re not using Instagram stories as part of your social media content schedule, where have you been?! They’re a great way to grow your know, like, and trust factor because stories are less curated and more organic, giving your followers a real taste of you.
Just like you can sprinkle Instagram posts over 2 weeks from one blog post, you can do the same with Instagram stories. And you might even get more information and feedback than asking followers to leave a comment.
Here’s how I would use Instagram stories over a 2 week period:
Story 1 - the same day as post 1 above, do a series of stories sharing your struggle about your potential blog topic a few days before you plan on writing it. Remember, these are research posts, we’re looking to know what they struggle with so you can educate them in your blog post. At the very end, ask them what their #1 struggle regarding that subject, and put up a question box so they can share with you.
You can share their answers in further stories over the next 24 hours, and say that you’ll be writing a blog post to have all your helpful info in one place.
Story 2 - share a sneak peek when you’re writing the post by doing a fun Boomerang of scrolling down your blog page
Story 3 - the day that you share your new blog post announcement (post 2 above), do a series of stories summarizing the info that you shared in the blog. At the end, remind everyone that they can click the link in your bio to read the full blog post, and if you have a freebie or content upgrade on your blog, mention that as well.
For even more engagement, you could put a poll sticker on one of the last 15 second stories asking if they found this info helpful.
Story 4 - if you know when you’re doing your Instagram live, announce it on your stories and put a countdown timer sticker on it. When viewers click on it, they’ll receive a notification at the time of your live so that you’re less likely to be talking to no one (is there anything worse than doing a live when no one is watching?!).
You can do this a few days before, the day before, and even a few hours before. The countdown sticker will be saved so you can use the same one and all the times will be consistent.
Story 5 - immediately after you’re done your live, do a story reminding everyone that it’s available for the next 24 hours
Story 6 - after you upload your IGTV video from your Instagram live (you’ll read more about this below), you could share another series of stories about how you did a live a few days ago on X subject, but if you missed it you’ve uploaded the recording.
Review some of the great questions you were asked and what points you covered. At the end, mention that they can swipe up to watch the video (yes, everyone has the swipe up feature for this, keep reading for details!).
#4 Instagram + Facebook Live
Time required: 45 minutes
So we think everyone has already seen our calls to action in our posts to read our blog, right? WRONG! Sometimes people like to watch videos instead of reading blog posts, so let’s hit them with all the ways.
Live videos are a great way to engage with your audience, get their feedback, and answer questions all at the same time.
But again, you’re not just doing a live video to only use it once, we’re going to repurpose it again! Stay with me.
First things first, you’re going to go live on Instagram AND Facebook at the same time, because why would you do the same thing twice?
You most likely have a phone and a laptop/desktop computer to run your business. You’re going to go live on Instagram from your phone, and go live on Facebook on your regular computer at the same time. When I begin, I like to mention that I’m live on both platforms, and I put my phone (on a stand) slightly in front and a little bit to the side of my computer camera, that way if I’m looking at once device, I’m still pretty much looking in the direction of the other.
To make sure we can repurpose the Instagram live that you’re recording on your phone, make sure that your face hits about 1/3 of the way from the top of the screen by moving yourself away or towards the camera.
The best part about doing a live video like this after you’ve written a blog post is that all your talking points are already laid out for you! No worrying about going off on tangents or getting off topic. The only thing you need to do is read your points from the blog, and answer questions or interact with your audience.
This is the most important part to remember:
Immediately after you finish the live video on Instagram, remember to download the video to your phone (click here for instructions).
It may take a few minutes to download, but don’t think it’s not working and shut down the app. This is your only chance to get that recording, and we’re going to use it for something else.
When you’re done going live on Facebook, you’ll easily be able to download that video at any time by finding the video either in your feed or the video section of your page, clicking on it, then click the three dots in the right hand corner. You’ll see an option to download the video and save it to your computer.

Your Instagram live will stay on your stories for 24 hours, but your Facebook live will live on forever unless you delete it. Yay, evergreen content!
#5 IGTV
Time required: 30 minutes
So you did an Instagram live and made sure to save it to your phone, now you’re going to upload it as an IGTV video so it will live on forever, too!
Not many people use IGTV, but here are some slightly unknown reasons why it’s still worth trying it out:
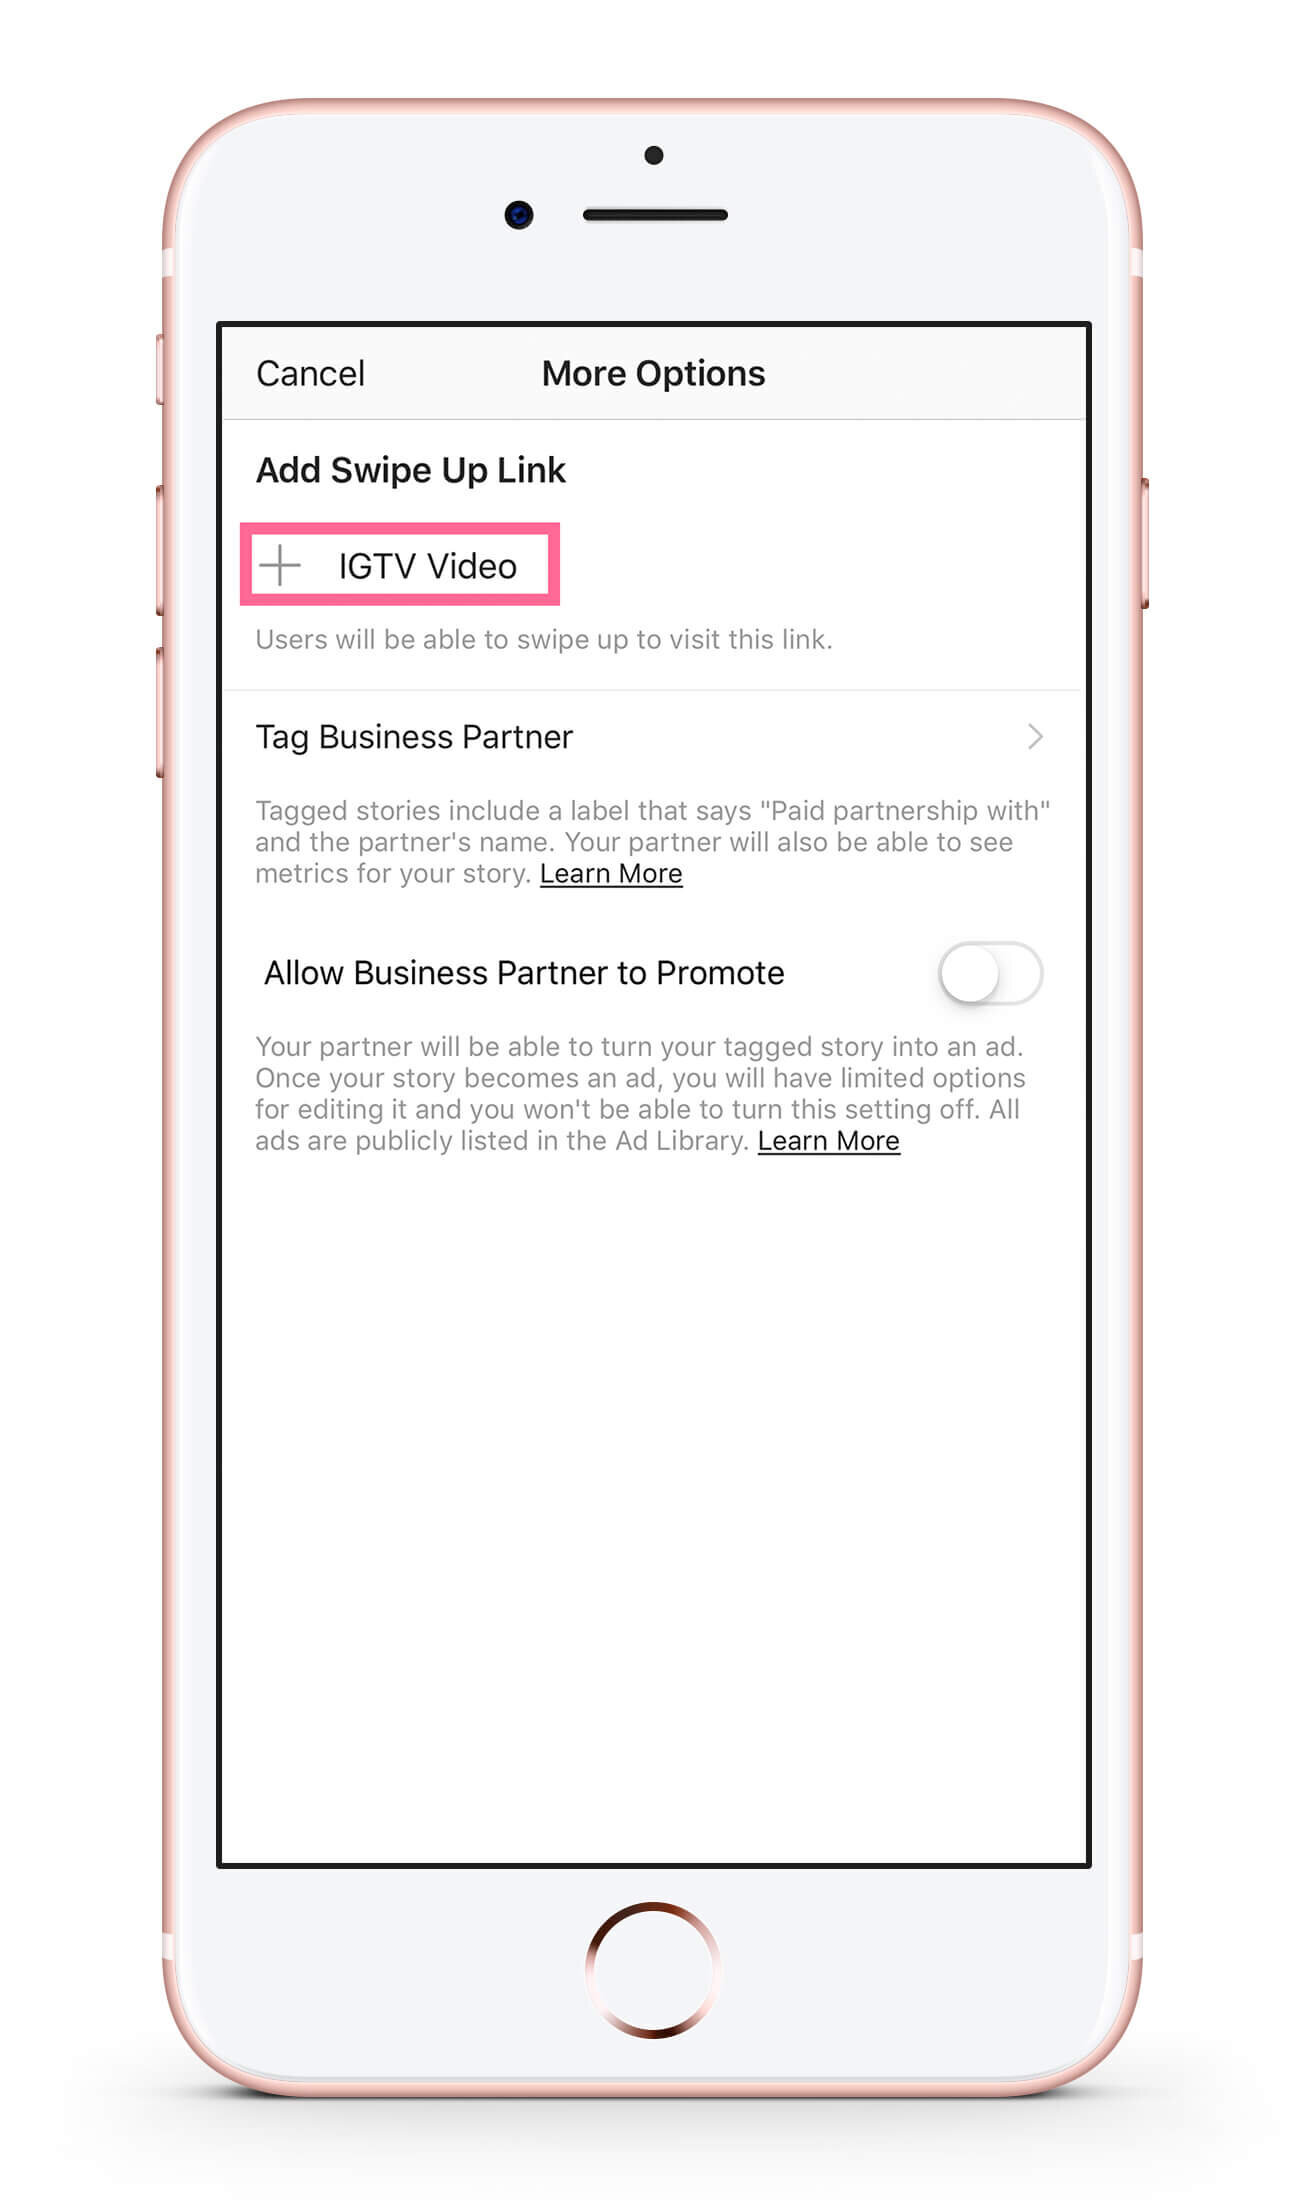
You can put clickable links in the caption - during your video, if you mention a free downloadable in your blog post or another resource on your website, put the link in the caption.
You can link to IGTV episodes from Instagram Stories using the swipe up feature even if you don’t have 10,000 followers (that’s right!) - I didn’t know why I had this little link icon in my stories, and it’s because I have some IGTV videos! At any point in the future, if you’re talking about the same subject and want to repurpose your existing content, just do a story about it and you get to say “swipe up for my IGTV training on X”.
You get the swipe up feature, and YOU get the swipe up feature, everybody gets the swipe up feature!

Since your Instagram live stays on there for 24 hours, you don’t have to upload your IGTV video right away, but the next day or two after (or even the week after).
If your video is 15 minutes or under, you can upload it directly from the IGTV app on your phone.
If your video is between 15 and 60 minutes, you can only upload it from your computer. Go to your profile on www.instagram.com, click on the IGTV icon to the right of your posts, and then use the blue upload button.

When you upload videos to IGTV, you have one chance to add a cover image and share it to your feed as a post. Sharing your IGTV video to your posts will increase the views dramatically, as it will automatically start playing the first minute as soon as someone sees it in their feed.
If you are going to share it as a post, I’d give it a different headline than the blog title that you have already shared as one of your posts, or else it will look the same.
Your cover image could also include a screenshot of your video to make it more interesting, like these from Caroline and Jason at Wandering Aimfully. That way it looks like a regular post in your feed just like anything else.
Again, not to sound like a broken record, but by using templates for all of these cover images, you’ll save yourself hours of time.
There are a few free IGTV cover templates in Canva that are not ideal because they’re not spaced correctly and text is likely to get cut off in either the preview to your feed or by the IGTV app itself. If you want an up-to-date template, here’s a better one in Creative Market.
#6 YouTube
Time required: 30 minutes
Remember that Facebook live that’s in a wider format than the IGTV recording? It’s perfect for uploading to YouTube as part of your social media content schedule!
YouTube videos are highly searchable within Google, and they now show up on the top of Google search results (right below the sponsored ads).
If you already invested the time to record the live video, why not repurpose it on a platform that is highly searchable and will only take you less than a half hour to upload it?
Just like IGTV, you’re going to want to create some thumbnail art (ie. YouTube video cover), and Canva has several free templates that are modern and simple, and you can easily customize to your branding in minutes.

Reuse your IGTV caption to save even more time, just remember to keep keywords in mind, as YouTube is it’s own search engine, as well as being referenced in Google searches.
So there you have it, how to create a 2 week social media content schedule in less than 4 hours!
If this felt chaotic to you, that’s because it seems like a lot and that it’s spread out over 2 weeks.
To help you put this plan into action, I put together a simple Google spreadsheet so you could see exactly what to post on what days over 2 weeks.
You can duplicate the spreadsheet and move the content around to fit your schedule and make it work for you. For example, you’ll want to publish your Instagram posts and do your live videos at popular days and times for your account.
This schedule batches as much content creation and posting together to leave as many free days as possible for other business activities … like actually working with clients and other income producing activities.
I like adding the tasks either into Trello and assigning a due date, or putting the task as a block of time in my calendar to make sure it actually gets done.

Just fill in your info below to get the “2 week social media schedule” spreadsheet!
See? Content creation for ALL the social media platforms doesn’t have to be so hard or feel like you spend all day, everyday on it. With a little planning and intention, you can totally be “active” on social media most days without having to be on social media most days.
I know that not everyone is as Type-A as me, and maybe you don’t want to be so rigid with your schedule, but I crave entire days to work on other projects when I can really sink my teeth into them.
Knowing that I can quickly show up on an Instagram story, and then fully focus on something else for the next 5 hours makes me feel like I’m a total boss. When I’m trying to remember and do all the things at once, I end up overwhelmed and don’t show up anywhere.
Let me know in the comments if this helped, and I especially know if you have your own system or secrets that could make mine even better!
*This post includes affiliate links, but know that I’d never recommend a product or service that I don’t personally use!


