
How to migrate from WordPress to Squarespace in 8 easy steps

So you’re ready to migrate from WordPress to Squarespace, but then you did some Googling and now you’re overwhelmed AF. Did I hit the nail on the head? It’s totally normal to feel like this when you’re switching website building platforms. I’m here to make it was easy for you as possible.
Sidebar: Why would someone want to switch from WordPress to Squarespace in the first place? If you're still like "Squarespace vs WordPress vs Wix: which one is best?", then click here to read all about the pros and cons of each website building platform, and which one is best for your business.
Pre P.S. This post contains affiliate links. When you click on an affiliate link and make a purchase, I receive a small commission at no cost to you. Affiliate links are marked with an asterisk (*).
This is a juicy, step-by-step blog post, and there’s a ton of content in this article, so here’s a table of contents if you want to skip to certain sections:
TABLE OF CONTENTS:
Step 6: Confirm urls, update SEO details & Redirect your blog posts and any old pages
Step 8: Transfer your domain to your new Squarespace website
There are a few things you need to do/know first before starting to migrate all your content:
What to do before you migrate from WordPress to Squarespace
The biggest thing to remember before you switch from any website builder to another is that it can temporarily affect your SEO, or Search Engine Optimization, rankings. This means it could affect your ability to be found when people search specific terms on search engines such as Google.
If you don’t have a lot of search engine traffic (we’re talking only a few hundred clicks or less a month) or if your business doesn’t depend on search engine traffic to grow, then this isn’t something you need to worry a ton about.
However, if you’ve built your business growth around SEO or it’s a major part of revenue generation, you’ll absolutely want to follow the steps below.
You can minimize the effects of switching from WordPress to Squarespace by doing the following:
Record all of your current URLs (including all pages, blog posts, and products in any online shop) on a spreadsheet or in record keeping software, like Google Sheets, along with:
- the page name
- SEO title
- SEO description
If you have a ton of different pages, many blog posts, or more than a dozen products in an online store, you can use Google Analytics or the Google Search Console to export a list of your pages with the matching URLs (click here for step by step instructions for Google Analytics).
I’ve provided you with a template below if you keep reading.Keep your current WordPress website active until your new Squarespace website is 100% ready to go live and launch to the public. This will allow you time to do all the re-mapping behind the scenes of any current content so you can minimize the SEO impact as well as the website visitor experience!
Don’t worry, the steps below will take you through how you build your new Squarespace website behind the scenes, and how to connect it to your current domain when it is ready.Keep using the same domain name. I’ll show you exactly how to point your existing domain to your new Squarespace website in the steps below.
The important thing to do is to keep organized from the start so you can make the transition as painless as possible. I find Squarespace so much easier to use and maintain than WordPress (unless you’re using ads on your blog!), which makes this annoying preparation step worth it.
Now you’re done organizing your current content, so let’s move onto the next part.
Here are the exact steps to migrate from WordPress to Squarespace in 8 easy steps:
1. Do a content audit
Think of step 1 like spring cleaning for your website, also known as deciding what current content to keep. This includes all pages, blog posts, and maybe even products in your online store to keep and migrate to your new Squarespace website.
The following list is the data that I’d recommend reviewing for each piece of content, and you’ll want to set the time frame for the last 6 months or year to keep the data relevant in the fast-changing online world. However, you could consider historical data for important pieces of content, like a best performing blog post.
Data to review:
Page views: does this piece of content even get any attention at all?
Opt-in percentage: if there’s an opt-in on a certain piece of content, does it convert? Depending on where the opt-in is, it could convert as low as 1% (for a blog sidebar, for example) or as high as 30%+ if it’s a dedicated landing page. Consider getting rid of any underperforming content pages, or even redoing any lead magnets you have that don’t convert well.
Page value: if you’ve set up conversion goals that lead to revenue for certain pages (such as sales pages), what is the page value for the given time frame? Obviously you won’t want to get rid of any high value pieces of content!
Use a simple Excel spreadsheet and record the name, URL, data above (page views, opt-in percentages, page value), SEO title, and SEO description/meta description of every page, blog post, and online product on your current website.
You could also add on an end column that’s a checkbox for you to check off if you want to update the content (especially old blog posts).
This is what my own content audit looks like as of writing this blog post:

Even though I’m not migrating platforms right now, I’m going to come back to this after I’m done writing to clean up my own website!
2. Export your current WordPress content
In Squarespace, you can import the following WordPress content directly into your new Squarespace website:
Regular website pages
Blog pages, blog posts, and authors
Comments
Categories and tags
Squarespace won’t import content from plugins, gallery images, image captions, images saved in your Media Library that are not attached to any posts or pages, and style or CSS (we’ll get to this later).
To prepare your current WordPress website to import into Squarespace, navigate to your WordPress dashboard, then go to Tools > Export.
Simply check “All content”, then the “Download Export File” at the bottom:
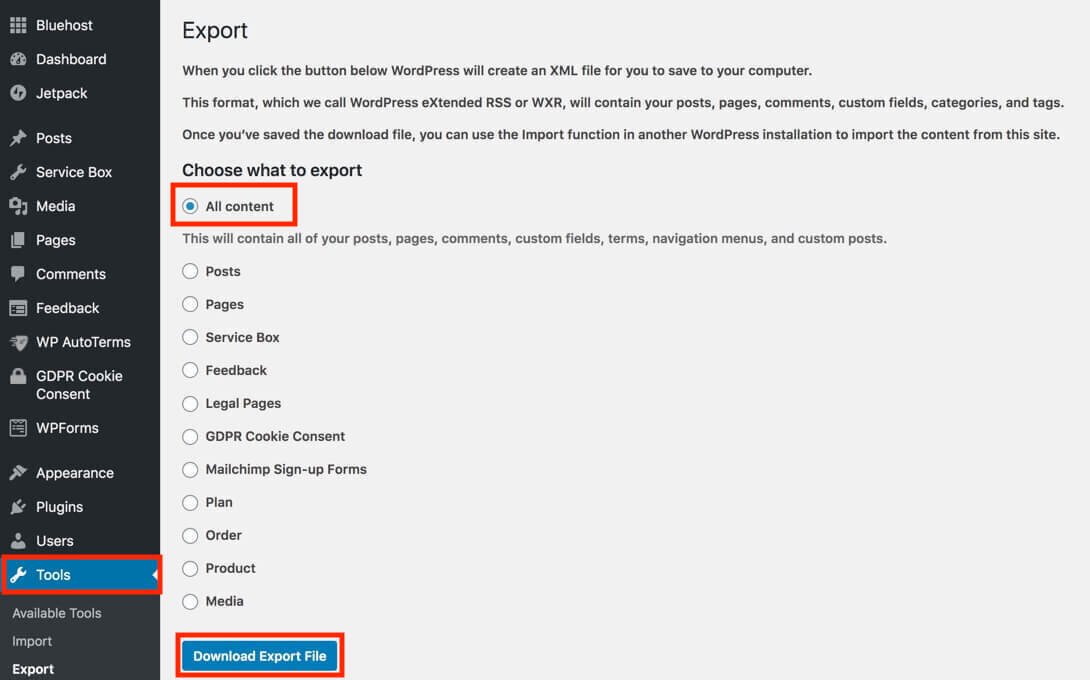
This will create an XML file for you, which you can safely store on your computer until we’re ready to use it.
3. Create a new Squarespace website
Now it’s time to get set up on Squarespace so you have somewhere to import your newly downloaded WordPress XML files.
Here’s how you get started on Squarespace:
1. Click here* and then click one of the big “Get Started” buttons (use that affiliate link and you’ll get a 6 month trial — instead of the regular 14 day trial — plus 20% off an annual subscription).

2. On the next screen, answer a few questions about the purpose of your website (or choose “I’m just browsing” from the upper right hand corner), and it will take you to the pre-built website templates that you can start with.

3. Once you see a template that you like, hover over it and click on “Preview [name of template]”. You can view it on multiple screen sizes by clicking on the device icons in the upper left hand corner. You can see the entire demo site by clicking on “View Demo Site” in the upper right hand corner, which will open it in a new tab.

4. If you want to view another template, choose “Back” in the upper left hand corner, and view the demo of as many other templates as you like. If you’re ready to start with a certain template, click on “Start with this design” from the upper right hand corner.

5. Once you’ve clicked on “Start with this Design”, you’ll then be taken to a login page, where you can create your Squarespace account. If you already have an account with Squarespace, you can choose “Log in” from the upper right hand corner and enter your login details.

6. Once you’ve created your account or logged in, it will take a few minutes for your template to be built, and when it’s ready you’ll be taken to your website back end home page. You can get rid of the banner at the bottom telling you how much time you have left in your free subscription (and then the banner with the “Publish your site” button) by clicking the X in the bottom right hand corner.
Note: You don’t have to upgrade to a paid Squarespace subscription until either your free trial runs out OR if you want to launch your new website to the public, whichever comes first.

7. Navigate to your website pages by clicking on “Pages” from the left hand side of this home screen.
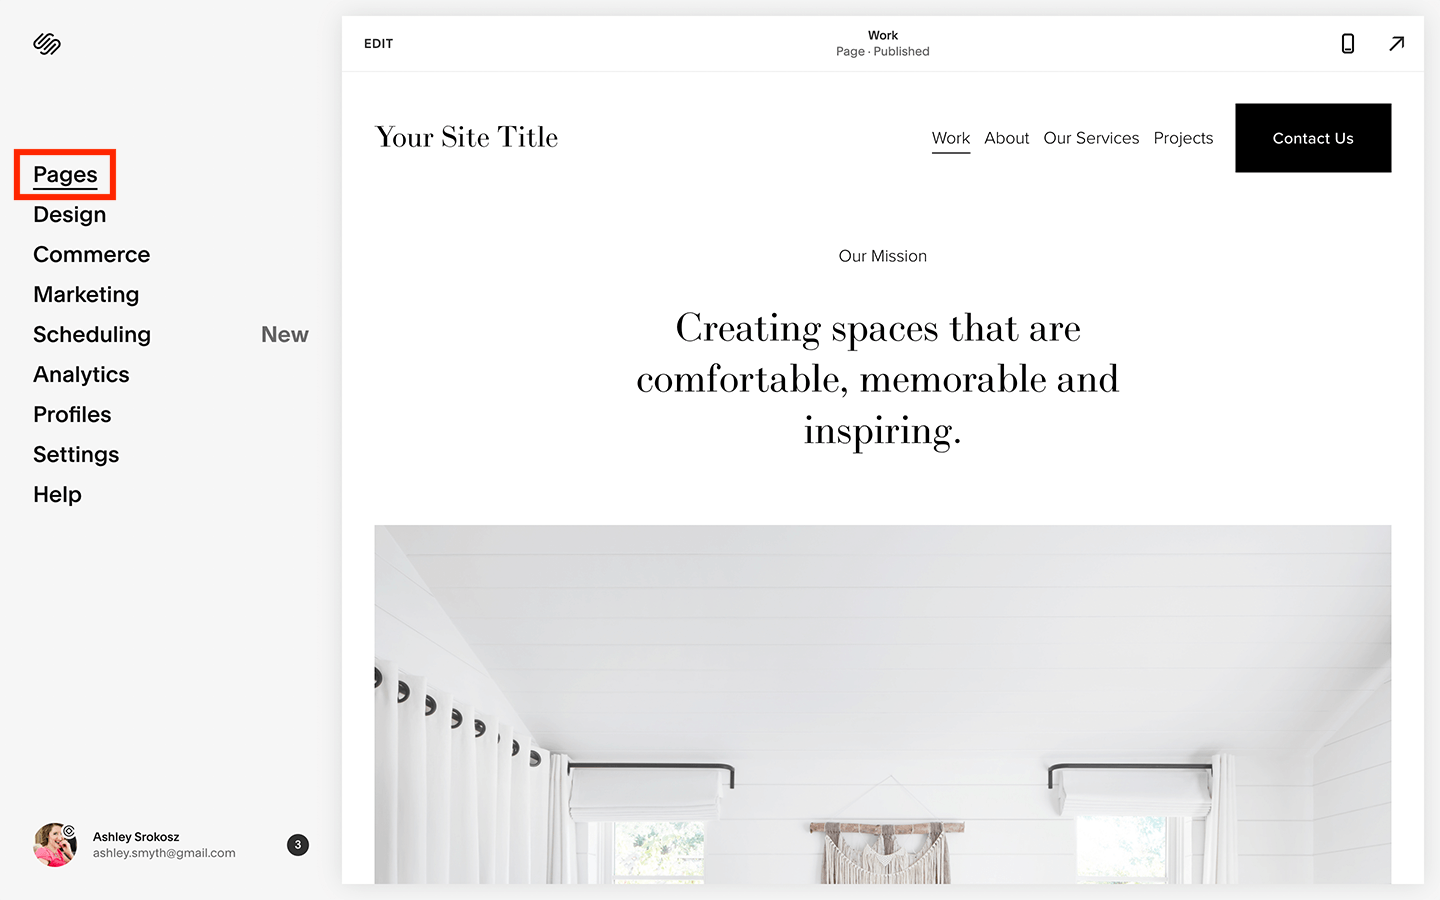
The pre-built demo pages that come with the template will be there with the word “Demo” to the right of the page name in light grey.
8. Delete all the demo pages by hovering over the page name. You’ll see a red garbage can icon show up to the left of the page name. Click on that, and confirm that you’d like to remove the demo pages. You’ll have to do this for each demo page and collection.
You won’t be able to delete the home page, just keep it there until after you import your WordPress content.

Now that you’ve got a blank canvas, you’re ready to move onto the next step!
This is where you can customize your website name, logo, fonts, and colours:
9. To change the website name and logo, first choose any page from the left hand pages menu, then click on “Edit” in the upper left hand corner of the page preview window.

10. While in edit mode, when you hover close to the top of the page, the header will become greyed out, and you can click the “Edit site header” button.

11. From there, the header menu will appear. You can click on “Site title & logo” to change these settings. Feel free to explore the other settings.
12. Enter your website’s name under the “Site Title”, and if you have a pre-designed logo you want to use, you can click on the + symbol under the “Logo image” section to upload it. Alternatively you can drag your logo file over the "Logo image” section and it will upload as well.
Even if you are using a logo image, you’ll still want to enter your Site Title for SEO purposes.
When you’re done editing the site title and logo, you can click on “Back” to continue editing other heading settings, and/or click on “Done”, then “Save” from the upper left corner of the page preview window.
13. Now it’s time to change your website fonts and colours. Navigate back to the Squarespace backend home page by clicking on “Home” button in the top left hand corner.

14. Click on “Design” to access the site styles.

15. Click on “Site styles” to access the fonts and colours.

16. You’ll see the site styles menu open on the right hand side of the screen. Click on “Fonts” to change your various website fonts (including headers, paragraphs, and buttons, amongst other font selections), and “Colors” to change your website colours.

To exit this design settings screen, click on “Done”, then “Save” from the top left-hand corner.

Now that your website is all set up with your fonts, colours, logo and site title, it’s ready to bring all your existing WordPress content over to.
4. Import your WordPress content
Navigate back to the homepage of the back end of your Squarespace website builder software by clicking “Home” in the top left-hand corner.

Now click on “Settings”, then “Advanced”, then “Import/Export”.
Now click on “Import”, then choose the WordPress icon from the list of platforms.
On the top of the pop-up box, choose “Advanced”, keep the processor as “Standard WordPress”, then drag your WordPress XML file into the box where it says “Add a file”. Alternatively, you could click on the “Add a file” area, and it will bring up a command box for you to navigate to where you saved your XML WordPress backup file on your computer, from which you can upload it.
When the file is uploaded, click on “Begin Import”, at which point the import will start.

Note: the import can take several minutes depending on how much content you are bringing into your new Squarespace website. Just be patient, it will tell you when it’s done!
Once you click on the success message and navigate back to the pages menu, your imported content will show up under the “Not-linked" pages.
If, for some reason your imported content doesn’t show up when you navigate to the pages menu, refresh the entire website and it should show up.

5. Restyle your pages and blog posts
When your pages and blog posts import, they might not look exactly the way they did on WordPress, and you’ll most likely have to spend some time styling them all.
Simply navigate to the page that you want to make changes on, and click “Edit” from the top left-hand corner of the page preview.

If you want to edit a text block, click on the text you want to change. This works exactly like any word processing software does, such as Microsoft Word, Pages for Mac, and Google Docs. When you click on a text block, a text editing menu will pop up with all of your possible style changes.

To change other types of blocks, click directly on the block you want to make changes on. Click on the edit icon that will show up on a menu bar directly overtop the block.
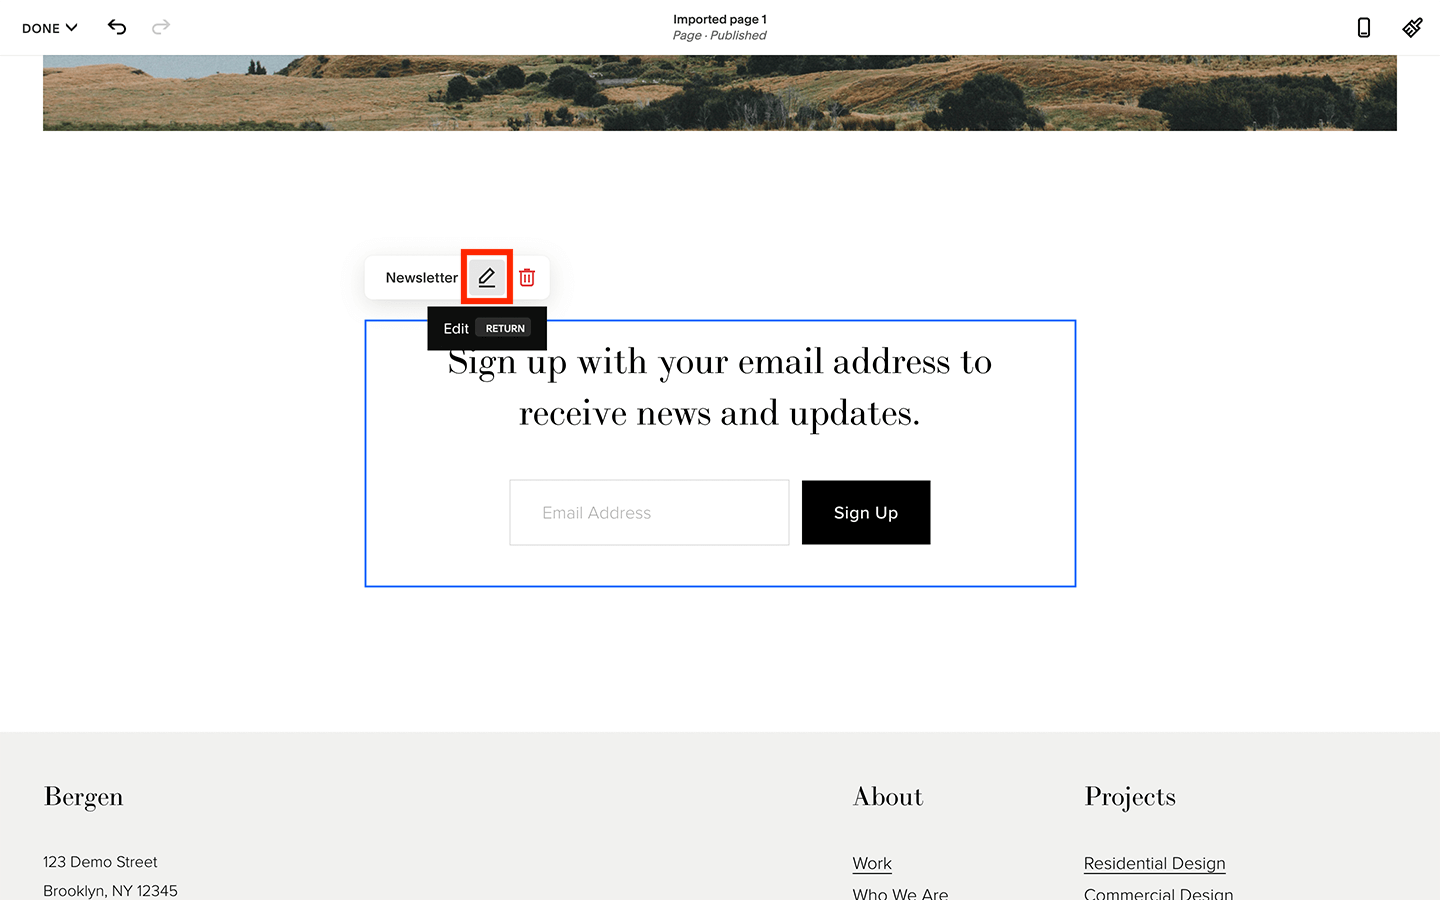
Once you click on the edit icon for any block, the block options available to that specific kind of content will appear so you can make changes.
Note that the options that you can change are different for each type of block. It’s fairly intuitive once you start using it, so just start clicking and seeing what’s possible in Squarespace (which is almost anything!).

Lastly you can drag and drop the blocks to your heart’s delight. Hover over a block and hold down your mouse key, and then drag it to where you want it to go.
If you’ve never used Squarespace before, there will be a learning curve (as with any new piece of software). I find Squarespace one of the easier pieces of website building software available today, so I have no doubt you’ll get used to it fairly quickly!
Don’t forget you can continue to make changes to colours and font sizes from the Design menu as well, as you might want to make changes when you see all your content imported into your new website.
6. Confirm urls, update SEO details & Redirect your blog posts and any old pages
Now that all the pages and blog posts you want to keep are imported and styled, it’s time to confirm your URL addresses, update your SEO details, and redirect any old pages or blog posts you decided to get rid of in the migration.
I recommend you confirm/change the URL address and SEO details together for each page at a time so it goes faster, but I’ve split up the different details into sections below so it’s easier to follow.
Confirm URLs
For all the pages and blog posts that you’re keeping, you want to make sure that the URL is the exact same as what it was on your WordPress website.
Refer back to the spreadsheet that you used to organize all your content before you started (I told you this would be useful!).
Navigate to the “Pages” menu, then click on the page you’d like to confirm or change.
Click on the gear icon to the right of the page name to access the name and URL options.

The page name and URL can be changed from the General settings from the left hand side of the menu that pops up. Just erase the placeholder settings of the option you want to change and type in the new name.
Note that in Squarespace, you can choose a different page title (this shows up on the top of the browser window) and a separate navigation title (that shows up in the navigation bar).
For the URL, make sure it exactly matches what was on your old WordPress website. For example, if your About page was yourdomainname.com/about, then set the URL slug of your About page on your Squarespace website to /about.

From this page settings menu you can also choose a new homepage. From the general tab in the page settings on the page that you want to be your homepage, scroll down until you see “Set as homepage” and click on that.

When you’re done making changes, click on “Save” from the upper left-hand corner of this page settings menu.

For blog pages, you change the URL the same as above, but for blog posts, this process is slightly different.
To change the URLs for individual blog posts, navigate to the imported blog from your pages menu. When you click or hover over on the title of the blog post you want to change, 3 dots will show up to the right of the title. Click on the 3 dots, then click on “Settings”.

This will bring up the blog post settings menu. Make sure you’re on “Content” from the left hand side of the blog post settings menu, and scroll down slightly until you see “Post URL”, where you can change the blog post URL.

Notice that there’s the blog subpage name already inserted in there, such as /blog/blog-post-title-t3h39w.
If you want to change the URL between the two slashes, you can do that by changing the blog page URL as shown in the instructions above for regular pages.
As always, click on “Save” in the upper left hand corner of the blog settings menu.
Update SEO details
Navigate back to the page settings by clicking on the gear icon to the right of the page name.
From the left hand side of the menu that pops up, choose “SEO”.
For any pages and blog home pages that aren’t set as the homepage, you can update the SEO title and SEO description on that SEO tab.
Note that you’ll find tips underneath each option that recommends a certain number of characters to optimize for search engines.

For the homepage, when you go into the SEO settings in the page settings menu, you’ll see that you can’t update them directly in that menu. You’ll see a button that says “Edit website SEO settings” that you can click on.

From there, you’ll change the SEO site description at the bottom. The SEO title is taken from your site title that you changed within the header when you first set up your website.

As always, make sure to click on “Save” from the upper left-hand corner after you make any changes.
For blog posts, it’s slightly different, just like changing the URL was.
Go back into the blog post settings menu for an individual blog post, just like I showed you in the changing URL section above.
Choose “SEO” from the left hand side of the blog post settings menu. From there, you’ll see where you can type in a new SEO title and SEO description for each individual blog post.

If you don’t add these in, it will be automatically generated for you from the blog content.
As always, make sure to click on “Save” from the upper left-hand corner after you make any changes.
Redirect any inactive or disabled content
After doing your content audit, you may have decided to delete any underperforming blog posts or pages. To minimize any decreases in your SEO results, you’re going to want to redirect that inactive content to the most useful active content on your website.
To do this, we’ll be setting up some 301 redirects. Think of this like your maps app on your phone rerouting you if you hit a road that’s closed for construction.
From the homepage menu of your Squarespace website, click on “Settings”, then “Advanced”, then “URL mappings”.
Now we want to list the pages and blog posts that we want to redirect.
The formula for this is:
<old URL> -> <new URL> 301
Here’s an example:
/URLofoldpage -> /URLofnewpage 301
Type the name of the old URL page address, but only the part that comes after your domain name.
For example, if the URL address of a page on my old website was www.ashleysrokosz.com/old-page, then I’d use /old-page.
Now we put a hyphen and right facing triangle bracket.
Then we follow it with the URL address of the page on the new website you want it to be redirected to, but again, only the part that comes after your domain name.
Then we put 301 as the redirect type, which tells search engines that this is a permanent redirect.
For blog posts, this is a little different, and you’ll need to redirect not only blog posts that are no longer active, but ALSO any active blog posts.
WordPress doesn’t use a blog subpage, you just choose the URL address of each blog post and it adds that to your domain name.
For example, an example URL address for a blog post on my old WordPress site was www.ashleysrokosz.com/blog-post-1, so you’d put /blog-post-1 as the original URL.
However, in Squarespace, blog posts are subpages, so the URL address is now www.ashleysrokosz.com/blog/blog-post-1, with ‘blog’ being the URL address that you applied to your blog page in the page settings.
For all active blog posts, your redirect list will probably look like this:
/blog-post-1 -> /blog/blog-post-1 301
/blog-post-2 -> /blog/blog-post-2 301
Notice that we’re simply adding in /blog before the URL address you already assigned in WordPress.
For inactive blog posts, redirect them to the most useful active blog post or active page.
Inactive blog post redirects will probably look like this:
/blog-post-3 -> /blog/blog-post-1 301
/blog-post-4 -> /new-page 301
As always, make sure you save any changes after you’re finished redirecting your URLs by clicking “Save” from the upper left-hand corner.
This is what the URL Mappings page will look like from our example above:

Bonus: Audit and improve your SEO
While you’re taking the time to audit your content and move platforms, why not take a bit more time to audit and improve your SEO in general? There’s probably a ton more you could be doing to get more organic search traffic, which (IMHO) is one of the most hands-off things you can do to grow your business and revenue.
I like to think I have an intermediate amount of knowledge about SEO and Squarespace, but I’d like to refer you to the master who I’ve learned from.
For all things SEO and Squarespace, consider taking Kate Scott’s Scale with SEO course*. It’s a cost effective way to generate thousands of website visitors (hopefully leading to thousands of dollars) from strangers on the internet typing their questions into Google.
7. Activate your Squarespace website
Now that your website is all set up and we’ve minimized any changes to your SEO from URL changes between your old WordPress website and your new Squarespace one, it’s time to make your new website public!
First up you need to activate your Squarespace website, which means upgrading to a paid account.
If you haven’t gotten rid of the banner at the bottom of your website that says “Publish your site”, go ahead and click that, then click “Upgrade to publish”.
If you don’t have the “Publish your site” banner, from the homepage of the backend of your Squarespace website, go to “Settings”, then “Site Availability”, then “Upgrade to publish”.
You’ll select the plan that’s best for you, and remember you can always choose the most affordable plan and upgrade at any time as you need more features.
Want 20% off your annual Squarespace membership PLUS a 6 month free trial instead of 14 days? Click here* and join Squarespace with my affiliate link.
8. Transfer your domain to your new Squarespace website
You’ve got one more thing left to do to migrate from WordPress to Squarespace completely, and that’s connect your existing domain name.
There are several different scenarios that could happen, depending on where you bought your domain and if you want to keep it with that company.
Since Squarespace has the most helpful and detailed support articles, I thought I’d link directly to them since there are so many domain companies.
Identify what scenario your domain name falls under, click through to the matching help article, and follow the directions for a smooth transfer of your domain name:
If you ever get stuck transferring or pointing a domain to your new Squarespace website, the best bet is to contact your domain company directly and they can walk you through the process.
So there you have it, how to migrate from WordPress to Squarespace in 8 easy steps. OK, maybe I should say ‘simple’ instead of ‘easy’. The most complicated part is going to be learning a new platform (albeit with an easy learning curve) and transferring your domain.
The good news is that there’s no need to transfer your domain name, so if that feels complicated, just leave it where it is and simply connect your new Squarespace website to your existing domain. Plus it will only take 3 days compared to 18+!
Welcome to the world of Squarespace, where there’s no security issues and no plugins to continually update. In other words, it’s an amazing place to be.
If you have any questions, you know where to find me.