
Blogging on Squarespace: The Ultimate Step-by-Step Guide to Easy Blogging

There is nothing better to help you build a sustainable business than blogging, and there is nothing easier than blogging on Squarespace. I said what I said. Now there’s a huge difference between just writing some words on your website and blogging to grow your business, and there are a lot of different things to keep in mind logistically (like how to boost your SEO).
If you’re ready to overcome the overwhelm and start blogging on Squarespace, then keep reading, because I’m sharing every little thing you need to know to grow your business with blogging.
This is the ultimate guide (I mean, it’s right in the title), and there’s a ton of content in this article, so here’s a handy dandy table of contents if you want to skip to certain sections:
Table of Contents:
Let’s jump right in:
Pre P.S. This post contains affiliate links. When you click on an affiliate link and make a purchase, I receive a small commission at no cost to you. Affiliate links are marked with an asterisk (*).
Why blog at all?
I’ve written about this ad nauseam before, feel free to read any of my previous articles on blogging:
The #1 non-negotiable biz building activity you need to be doing (+ a free blog planner)
Blogging tips: What I've learned from writing 85+ blog posts (+ a free blogging roadmap)
Let me summarize the articles above for you:
You want to be able to stop creating endless content on social media? Start blogging.
You want to be able to build trust with potential new clients faster? Start blogging.
You want to be able to sell out your services or program for the next few months with one email? START BLOGGING!
I am biased, after all, I’ve grown my business mostly with blogging and growing my email list, but I don’t know one person who isn’t fed up with social media lately. Personally, I’m done creating endless content for billion dollar corporations who are complicit when it comes to spreading misinformation.
I’m also an introvert who hates being “on” and performing 24/7 for strangers on the internet.
With a blog, you can write it once, and use it for years to grow your business. Some of my best performing blog posts were my first ones I wrote back in 2014.
Now if you do want to still grow your business on social media, you can use your blog posts to create content faster and easier by following my system to create 2 weeks of social media content in 4 hours.
Onwards to the debate I hear the most often when it comes to blogging on Squarespace:
Squarespace vs Wordpress for blogging
In this corner, we’ve got Squarespace*: a super easy to use, drag and drop website building and blogging platform.
And in this corner, we’ve got WordPress: the OG website building platform that’s clunky and overwhelming for people who can’t code.
One of the top myths about Squarespace is that it sucks for blogging, and “experts” will tell you this mainly because of SEO. We’ll get to that in a minute, it’s a major factor in picking which platform to use if you’re going to blog, but first I want you to consider the ease of use of your website.
If you can’t figure out how to update your website, you won’t.
If it’s not easy for you to blog, you won’t.
And if you have to pay someone $50 or $100 an hour to make simple updates, this will majorly hinder your business growth (and it’s profitability) when you’re just starting out.
Most of my readers are beginners, and if this is you, listen up (and if you’re not a beginner, you can read my in-depth Squarespace vs WordPress vs Wix website builder review here).
Don’t worry about step #100 when you’re on step #1.
You can’t build your business with blogging if it takes you an entire year to build your website because you went with a complicated, hard to use piece of software like WordPress.
You can always migrate to WordPress in the future if and when you need extra features and functions, but, I hate to burst your bubble, 80% of businesses fail in the first 5 years.
Give yourself the best chance of successfully building your business by using tools and software you’re capable of using with the skills you have right now, and get your website done and launched already! You have a better chance of successfully blogging on Squarespace instead of WordPress.
Ok, back to the SEO debate.
What’s SEO?
SEO = search engine optimization = the ability for a piece of content to be found by search engines (like Google).
It’s no secret that WordPress is great for SEO mainly because it has free plugins, namely the Yoast plugin, that makes it super easy to know if a blog post has been optimized for search engines or not.
WordPress websites also load quickly if designed properly, have thousands of plugins for customizing features and functions of your website, and are super flexible if you know how to design.
However, a downside of this is you have to know how to design websites almost on a professional level (or be willing to learn), and if you don’t constantly update your plugins, you can leave yourself open to having your website hacked (I have multiple friends who this has happened to).
Squarespace websites do historically load slower, although there are tons of things you can do to lessen this effect on SEO, such as compressing all images, using CSS code for customizations, and avoiding Javascript and any unnecessary scripts like tracking pixels.
But is there a Squarespace equivalent to the WordPress Yoast plugin?
Squarespace SEO plugin
I hate to be the one to tell you this, but there is no Squarespace SEO plugin. I know, 😭.
However, I can tell you that all the Yoast plugin does is basically act like a checklist for all the things in a particular blog post that helps it with SEO.
And the good news is you can just use your own checklist for optimizing your blog posts on Squarespace. Squarespace has an entire help article with a checklist of sorts for optimizing your entire website.
Click here for the Squarespace SEO checklist.
That checklist refers to your overall website and not each blog post, so let me make it easier for you to SEO each of your blog posts with a different checklist.
Click here or the image below to make a copy of the super simple Blog Post SEO Checklist (i.e. my own, homemade version of a Squarespace SEO plugin):

Best blog templates on Squarespace
There used to be at least a dozen different website and blog templates on Squarespace, and you couldn’t easily change between them, but with the introduction of Squarespace 7.1, that problem is solved.
There’s no need to choose between website templates at the beginning of the process when you’re not 100% sure what you need yet.
When you look at the Squarespace template page and are thinking to yourself “but what is the BEST blog template on Squarespace?”, just pick the one that looks the most like what you think you might need, and you can easily make any changes once you get inside the website building process.
Also, with Squarespace 7.1, you can now add as many sections as you want above or below your collection of blog posts, which means you can add beautiful header sections (including video banners!), search bars and category drop downs, and sections to focus on lead magnets so you can grow your email list.
I’ll walk you through how to set all these up in the sections below.
How to start a blog on Squarespace
First things first, if you want to start blogging on Squarespace, you have to start with setting up your website.
Note that you can decide if you have any other pages on your website, or if you just want a blog and that’s it. With any of Squarespace’s pricing options, you can add an unlimited number of pages, or even additional blogs, to the same website.
You can watch the video below for a complete walkthrough of how start a blog on Squarespace OR you can scroll below the video to see the step-by-step screenshots.
Step-by-step Instructions on how to start a blog on squarespace
1. Click here* to go to Squarespace’s “Get Started” page with your template options, and choose "Blog" from the Type menu.

2. Scroll down until you see a template you like, and click on “Preview [name of template"]”.
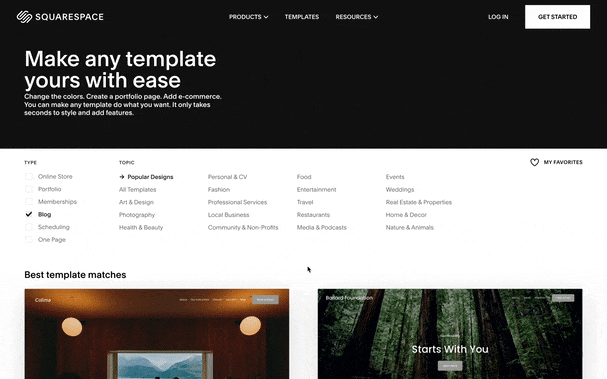
3. Click on “Blog” from the navigation menu of the preview website to see if you like it.

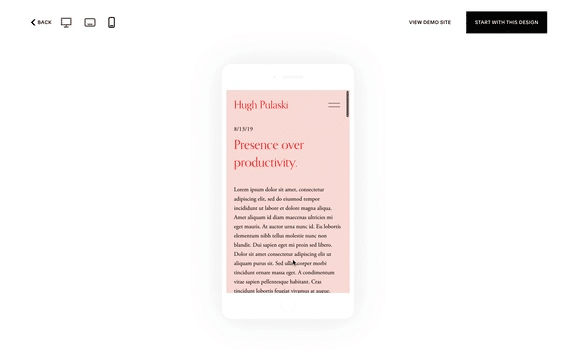
4. Make sure to check how it looks on mobile by changing the view in the top left hand corner from the desktop icon to the mobile icon.

5. If you like that particular template, click on “Start with this design” in the top right corner to start your 14 day free trial. If you don’t like the design, keep reading to see how to preview another template.
If you don’t already have a Squarespace account, it will prompt you to enter some information, and if you already have a Squarespace account, it will prompt you to login.
Once you’ve gotten started with a template design, go to the next section, or keep reading to see how to test out another template.
STEP-BY-STEP INSTRUCTIONS ON HOW TO preview a different website template
If you’re not happy with the template you’re currently previewing, you can simply preview another one by following these steps:
1. While you’re already previewing any website template, click the “Back” button in the upper left hand corner. From there, you can see the entire selection of website templates again.

2. Find another website template you want to preview, and follow the steps outlined above to view the overall website, the blog, and the mobile view, as well as to start with the template you love the most.

Change the blog layout in Squarespace
Like I said before, changing the blog layout in Squarespace used to be much harder in version 7.0. Your new website template style may or may not have the same functions. In fact, there was a HUGE chart I used to refer to so that I could easily see what features were available on what templates.
Thankfully that hassle has been solved with the introduction of Squarespace 7.1. Now, all features are available on every template, and there’s really no need to change your entire website template for a new blog layout, you can just edit the design settings in your current one.
There are tons of changes that you can make on the overall blog page and the individual blog post level, and it can feel confusing as to where you access what settings.
You can watch the video below for a complete walkthrough of how change the blog layout in Squarespace OR you can scroll below the video to see the step-by-step screenshots.
Step-by-step Instructions on how to change the blog layout in squarespace
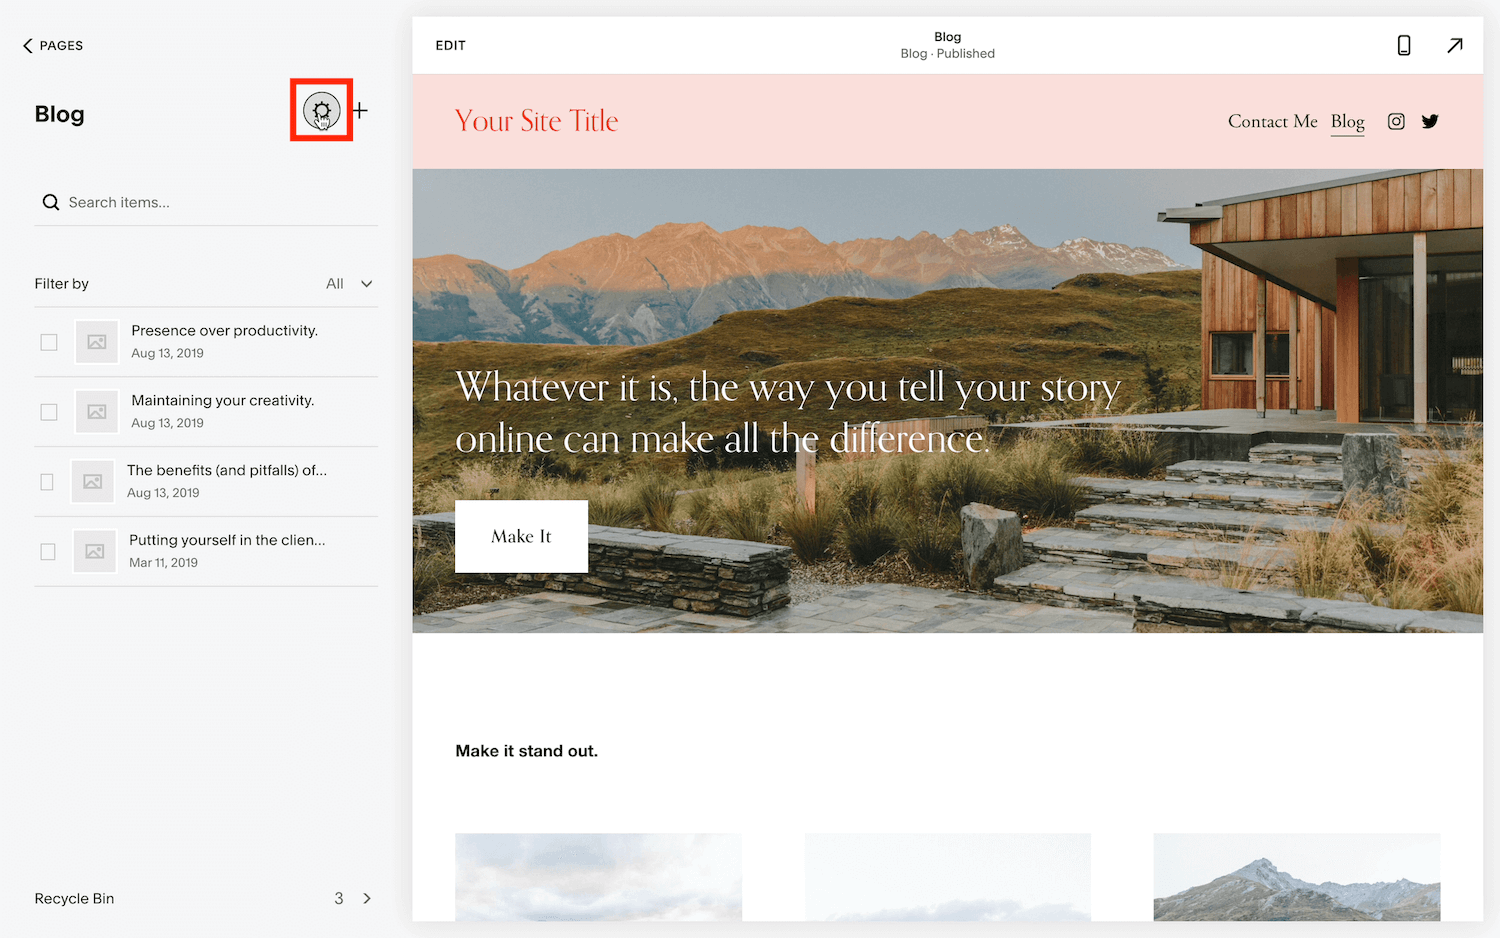
1. Navigate to the blog page from the home menu in Squarespace. This page is the overall blog page that shows a preview of a certain number of blog posts (that you can change later). This page does not show each individual, full blog post by itself, we’ll get to that later!
There will be filler blog posts already listed from the template installation. Feel free to keep them there to change the styles OR feel free to delete them and bring in a few of your own blog posts to see how the new style changes look.

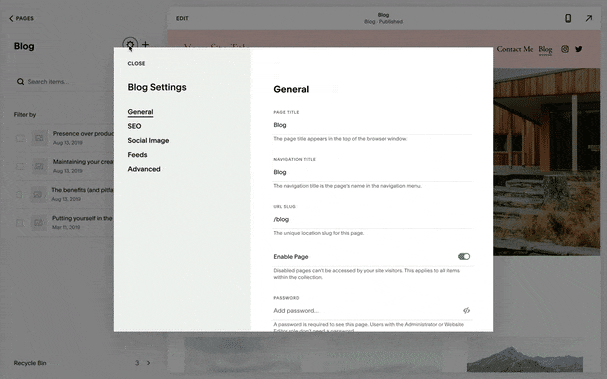
2. Edit the blog page by clicking the “Edit” button in the top left hand corner of the blog page.

3. Edit the blog page settings by clicking the pencil icon in the menu that shows up on the upper right hand side of the blog page, beside where it says “Manage Posts”.

4. First up we have the format settings. You can change the blog layout to several different formats that are automatically built into Squarespace, including single column, side by side, alternating side by side, basic grid, and masonry. Pick whichever one you like the most.

5. You can change multiple settings under page spacing. The first is the page width, which you can change from full to inset. This doesn’t actually change much, I usually keep this at full width.

Next up you can change the text content width. Just move the slider to the left and right, and you’ll instantly see what it looks like on the blog page. Alternately you can type in the amount you want in the box above the slider.
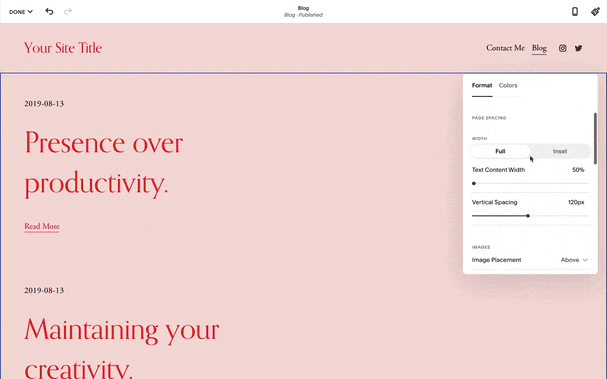
And lastly, you can change the vertical spacing. This is the vertical space between blog posts.

6. Next up you have image settings. Note: if you’ve chosen a template that doesn’t use images on the blog page, like I have done for this walkthrough, then you can leave this section as it is. If you want to add images to your blog posts as thumbnails, you absolutely can do that and then come back to these settings later.
You can move the image above or below the blog post, and change the image spacing by moving the slider back and forth.

7. Now we come to text alignment of the blog post preview. First up you can change the text alignment to left, center, or right.

You can choose to have the “Read More” link that shows below the blog post preview, or you can hide it.

You can change the title spacing by moving the slider to the left and right, as well as the “Read More” link (if you choose to show it).

8. Next up we have metadata settings. Metadata is the details associated with each post, such as its date published, author, or category/categories. As a rule, I choose not to show the date that the blog post was written. I do this because an older blog post that still might be full of relevant info might be brushed off to a reader because they think it’s too old.
You can choose to show the metadata at the top (above the title) or bottom (below the “Read More” link) of the blog post preview.

Choose which detail you want to show as the primary metadata content. You can choose category, date, or author, or if you choose none, then no primary metadata will be shown (this is what I do to hide the date).

You have the same choices for secondary metadata content. Choose a different option than above, or again choose none if you don’t want any metadata to show.

Finally, you can change the metadata spacing by moving the slider to the left and right. This will only show if you choose to show metadata details, and you haven’t gone the “None” route like I usually do.

9. Lastly under these format settings, we have iconography style. You can change the Delimiter style, but honestly? This setting has NEVER worked for me in all the last 5+ years I’ve been using Squarespace. So feel free to ignore this!
Underneath that is the option to change what content is displayed. You can choose to display the full blog post, the excerpt and title, or the title only.
I never display the full blog post, mine are just too long to do that. Most of the time I choose to display the excerpt and title.

10. Now we come to the colour settings (or color if you’re in in the US ;).
First up you’ll choose “Colors” from the top of the settings menu, to the right of “Format”. Then you can choose from 10 colour themes that Squarespace has automatically generated from your colour palette (I’ll show you how to change this in a few steps).
Just click over each option to see how the colours of the background, title, and other options change on the blog page.

11. Once you’re happy with all these settings, don’t forget to save your changes by clicking on “Done”, then “Save” from the upper left hand corner.

12. In Squarespace 7.1, they’d added the ability for you to add sections above and below this blog page, which is awesome for adding features like a search bar, categories dropdown, and other sections to draw attention to an opt-in.
You can add as many sections as you like!
To add a section at the top of your blog page, click on “Edit” from the top left corner of the blog page.

Then click on “Add section”, which you’ll see as an option when you move your mouse cursor close to the top of the blog page.

From here you’ll see all the types of pre-made sections. You can choose a category from the left hand side of the menu, and then choose an individual style from the pre-built options shown to you on the right.
You can also choose to add a totally blank section by clicking on “Add Blank +”.

13. You can also choose to add sections below your blog post page, it’s done the same way as adding sections to the top.
Start by scrolling to the bottom of blog page. When you move your mouse cursor to the bottom, but not over the footer, you’ll see the “Add Section” button show up that you can click.

From there, you can choose a pre-built section style or add a blank section. This is the same process as step 12. You can add as many sections as you like!

Once you’ve added your desired sections and edited them, don’t forget to save the blog page by clicking on “Done” then “Save” from the upper left hand corner.

14. There’s one more setting you can change on the blog page, and that’s how many individual blog posts you have showing as a preview.
To do this, click on the gear icon on the upper right hand side of the grey menu on the left hand side of the screen that shows all of your blog posts.
From that general tab on the blog page settings, scroll down until you see “Posts per Page” with a slider underneath of it. Move that slider to the left and right to change the number of blog posts that show as a preview on your blog page.
Click on “Save” in the upper left hand corner of this blog settings menu.

15. Now it’s time to make some changes to the individual full blog posts! Just a few more steps and you’re done setting up your Squarespace blog, I promise.
Before we go any further, note that any changes you make to one blog post will change for every single other blog post in that blog. That means you can’t choose a specific background colour for one blog post, and have a different background colour for another.
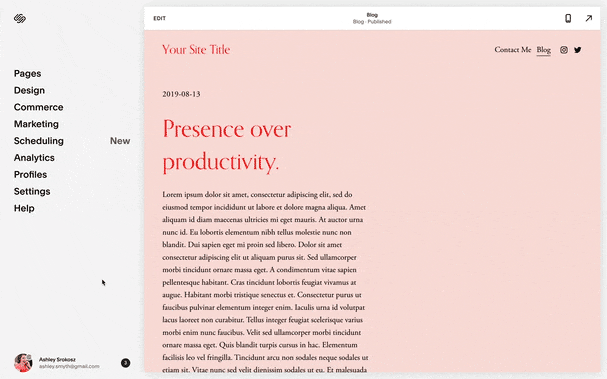
First, open up one of your blog posts (or filler blog posts) from the left hand menu of the blog page.

Then, click on “edit” in the top left hand corner, then click the pencil icon on the right hand side underneath the navigation bar. This will bring up the blog post format settings and colour options.

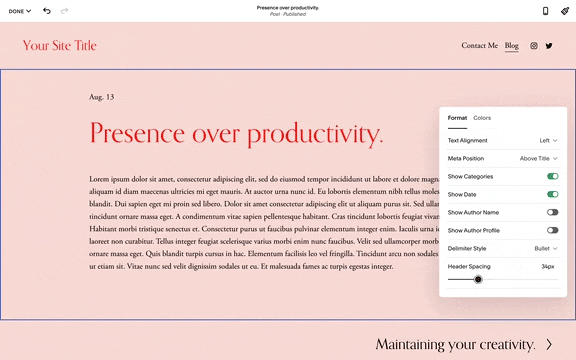
16. For the blog post format settings, you can change the blog post width. You can choose between small, medium, large, and custom, where. you can input your own width between 0 and 100 (these numbers representing the percentage of the screen width).

Next up you have blog post text alignment, which will change the alignment of the blog post title and metadata only. The body content will remain left aligned.

Next up we have metadata position. You can choose to show it above or below the title.

You can toggle each metadata option to on or off. If you toggle all 3 options off (show categories, date, and author name), it won’t show any metadata at all.
If you have multiple blog contributors that write for you, you may set up Author Profiles for each of them and want to show them at the bottom of blog posts. To turn this on, toggle the “Show Author Profile” on.
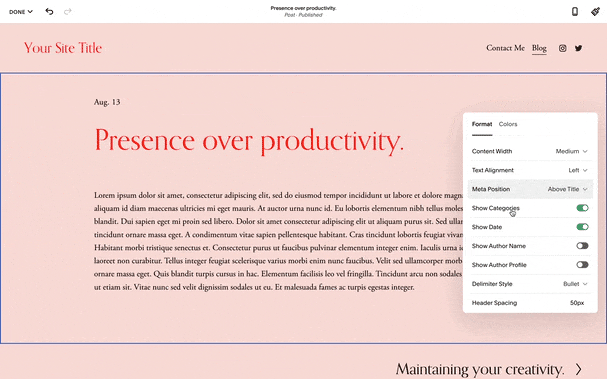
Again, just like the blog page, changing the Delimeter Style does nothing, so don’t bother changing it. Below that, you can change the header spacing by moving the slider to the left and right.

17. Just like how you can change the colour settings of the blog page itself, you can change the colours of the blog post pages.
Click on the “Colors” from the top of the blog post settings menu, to the right of “Format”. Then you can choose from 10 colour themes that Squarespace has automatically generated from your colour palette (again, I’ll show you how to change this in a few steps).
Just click over each option to see how the colours of the blog post background, title, and other options change.
18. Once you’re happy with how your blog post looks, don’t forget to click on “Done” and “Save” from the upper left hand corner!
Change blog post fonts and colours
You just learned how to change the format, and all the spacing and other settings for the blog page and each blog post, but what about the fonts and colours?
You can watch the video below for a complete walkthrough of how change the blog post fonts and colours OR you can scroll below the video to see the step-by-step screenshots.
Note: any changes that you make in the global settings will change every other page on your website. I like to make these change first at the beginning of the process of designing a new website, before I’ve designed any individual pages.
Step-by-step Instructions on how to change blog post fonts and colours in squarespace
1. When you’re on the blog page or on any blog post page, click on “Edit” from the top left hand corner.

Then click on the paintbrush icon in the upper right hand corner to access the site styles.

2. From the site styles menu, click on “Fonts” to access the font menu.

3. Click on “Headings” from the fonts menu, then “Family”, then you can click on “Browse all fonts” to see the entire suite of preloaded fronts in the Squarespace library.

To change the body font (the default font that the content in a blog post), click back from the top left of the grey fonts menu you’re in. Then choose “Paragraph”, and do the same thing as the screenshot above to change the font.

Navigate back to the main fonts menu, and click on “Assign Styles” at the bottom.

This is where you’ll confirm your font selection for the metadata and author profile (if using and not hidden), and your pagination fonts (used at the bottom of the blog post and blog post page to navigate to older and newer blog posts).

4. When you’re happy with your selections for all of your fonts (heading, body, etc), navigate back to the site styles menu by clicking “Back” and then “Site Styles” at the top of the grey menu you’re in until you get to the main Site Styles menu again.
You’ll see fonts, colours, and animations as some options on the master Site Styles menu.

5. To change the blog colours, click on “Colors” from the master Site Styles menu.
If you have brand colours you want to use, click on “Edit Palette”, and you’ll see 5 colours above the spectrum. Change these to your brand colours using your hex codes, starting with your lightest colour on the left, brightest colour in the middle, and darkest colour on the right.
If you don’t have brand colours, you can choose from the presets below the colour spectrum.

6. When you’re happy with your website colours, close the site styles menu by clicking on the paintbrush icon you used to open it.

And as always, make sure you save any changes by clicking on “Done” then “Save” in the upper left hand corner!

7. Double check that you like the font and colour styles you’ve changed by navigating to your home page (or another page), and scroll around to make sure you like what you see.

How to add a blog post on Squarespace
Now that you’ve changed all the design settings on your blog page and posts, it’s time to actually write your first blog post!
You can watch the video below for a complete walkthrough of how to add a blog post on Squarespace OR you can scroll below the video to see the step-by-step screenshots.
Step-by-step Instructions on how to add a blog post on Squarespace
1. Navigate to your website pages from the home menu in Squarespace by clicking on “Pages”.

2. Navigate to your blog page by clicking on “Blog”.

3. If you haven’t already, it’s time to delete the filler blog posts that were inserted into your blog when you installed your template. To do that, click on one of the blog post titles. You’ll see a checkbox selected to the left of the title. Select the checkbox on all the filler blog post titles, then click on “Delete” from the bottom of the gray menu.

4. Click on the + button at the top of the blog menu, to the right of the gear icon. This will take you to a new, blank blog post.

5. Click where it says “Enter a post title …” in gray, and type your blog post title.

6. Click below the title where it says “Write here …” in gray.
Type your blog content here just like you would in any other word processing program, like Microsoft Word, Pages for Mac, or Google Docs.

7. Add any other content into your blog post, such as images, videos, etc. The world of Squarespace blocks is your oyster! This is where a blog post acts pretty much like any other page on your website, other than you can’t insert new sections.
Hover to the top or bottom of the text block you just typed in, and you’ll see a blue + sign show up. Click on that, and choose a content block from the menu.

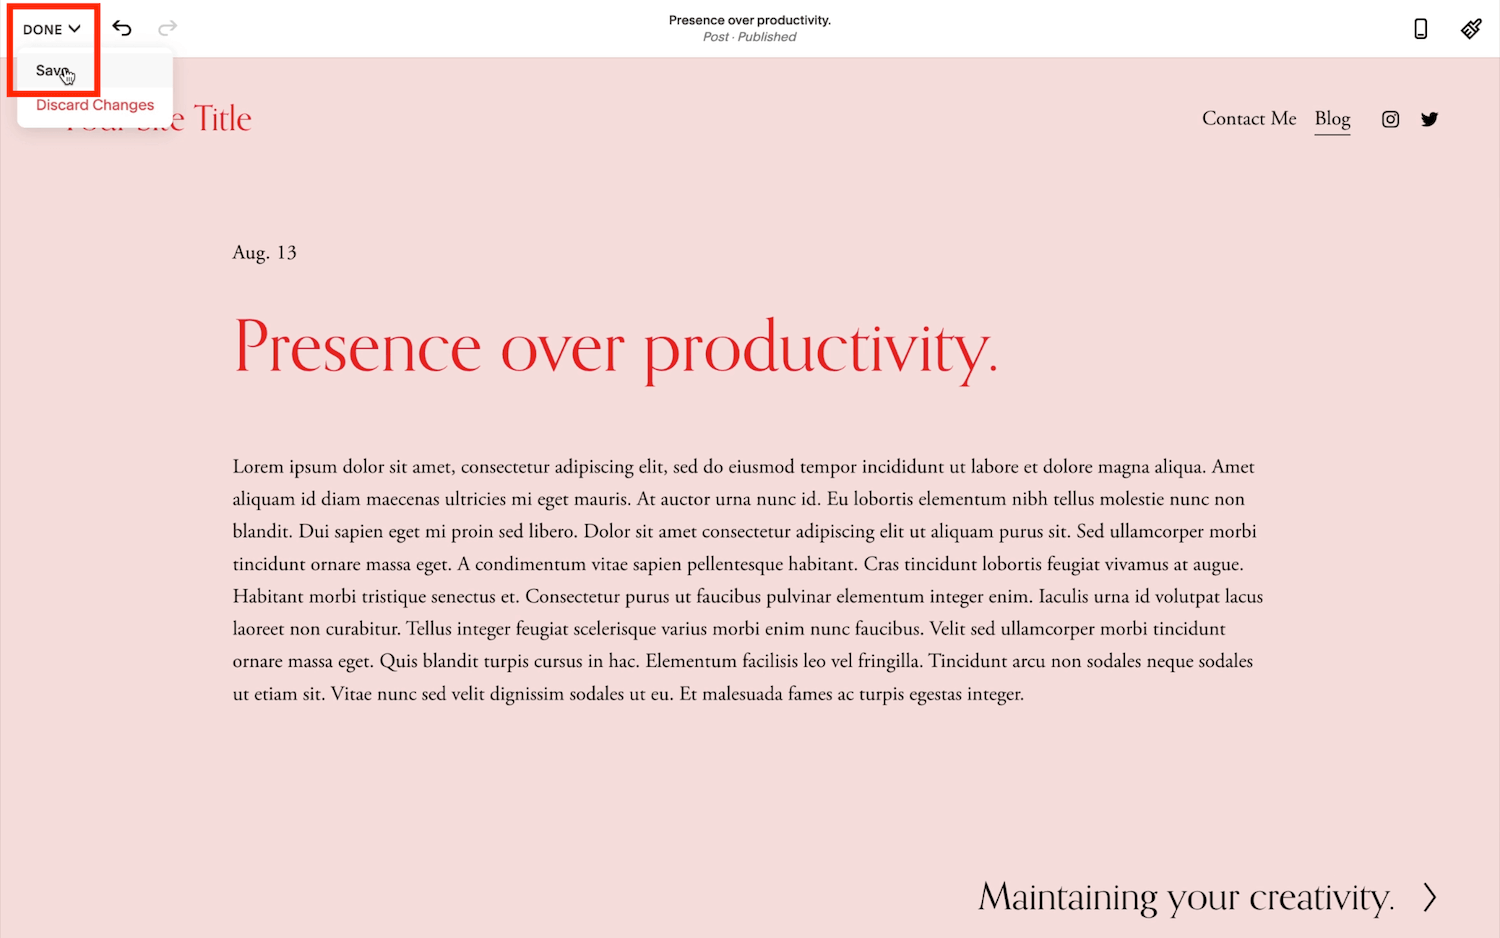
8. Once you’re done adding all your content, save your blog post. Click on “Done”, then “Save” from the upper left hand corner.
When you save a blog post like this, it saves it in a draft form so you can edit it later. It will not show up on your public facing website if it’s in this saved, draft form.
To publish your blog post so others can read it, click on “Done”, then “Publish”.
To schedule your blog post on a future date and time, click on “Done, then “Schedule”, and choose the date and time you’d like for it to go live and be published on your website.

9. To edit an existing blog post, whether it’s saved as a draft or already published and live, click on the blog post title from the left hand menu that shows all of your blog posts, then click on the “Edit” button in the upper left hand corner of the website preview screen.

How to add categories in Squarespace
One last feature you might want to use on your blog is the categories function. There’s a built-in categories drop down box that you can insert into a section above your blog page that makes it really easy for website visitors to focus on all your content in just one category (oh hey, user friendliness!), as well as to insert summary carousels like I have at the bottom of this very blog post.
You can watch the video below for a complete walkthrough of how to add categories in squarespace or you can scroll below the video to see the step-by-step screenshots.
Step-by-step Instructions on how to add categories in Squarespace
1. Select a single blog post that you want to add to a category.
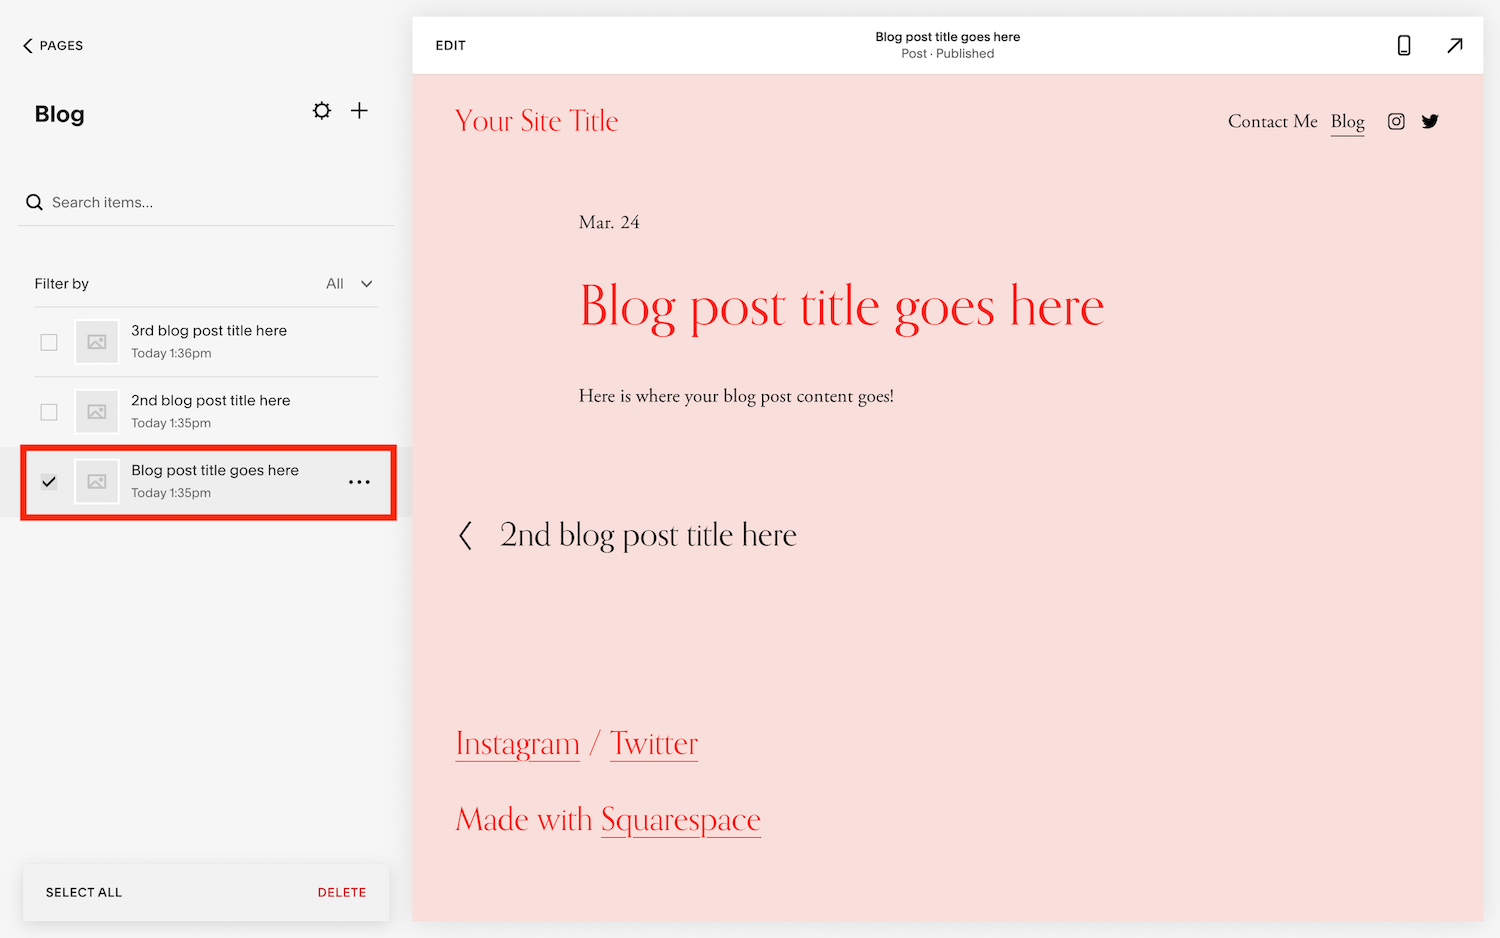
2. Click on the 3 dots to the right of the blog post title, then click on “Settings”. This brings you to the blog post settings.

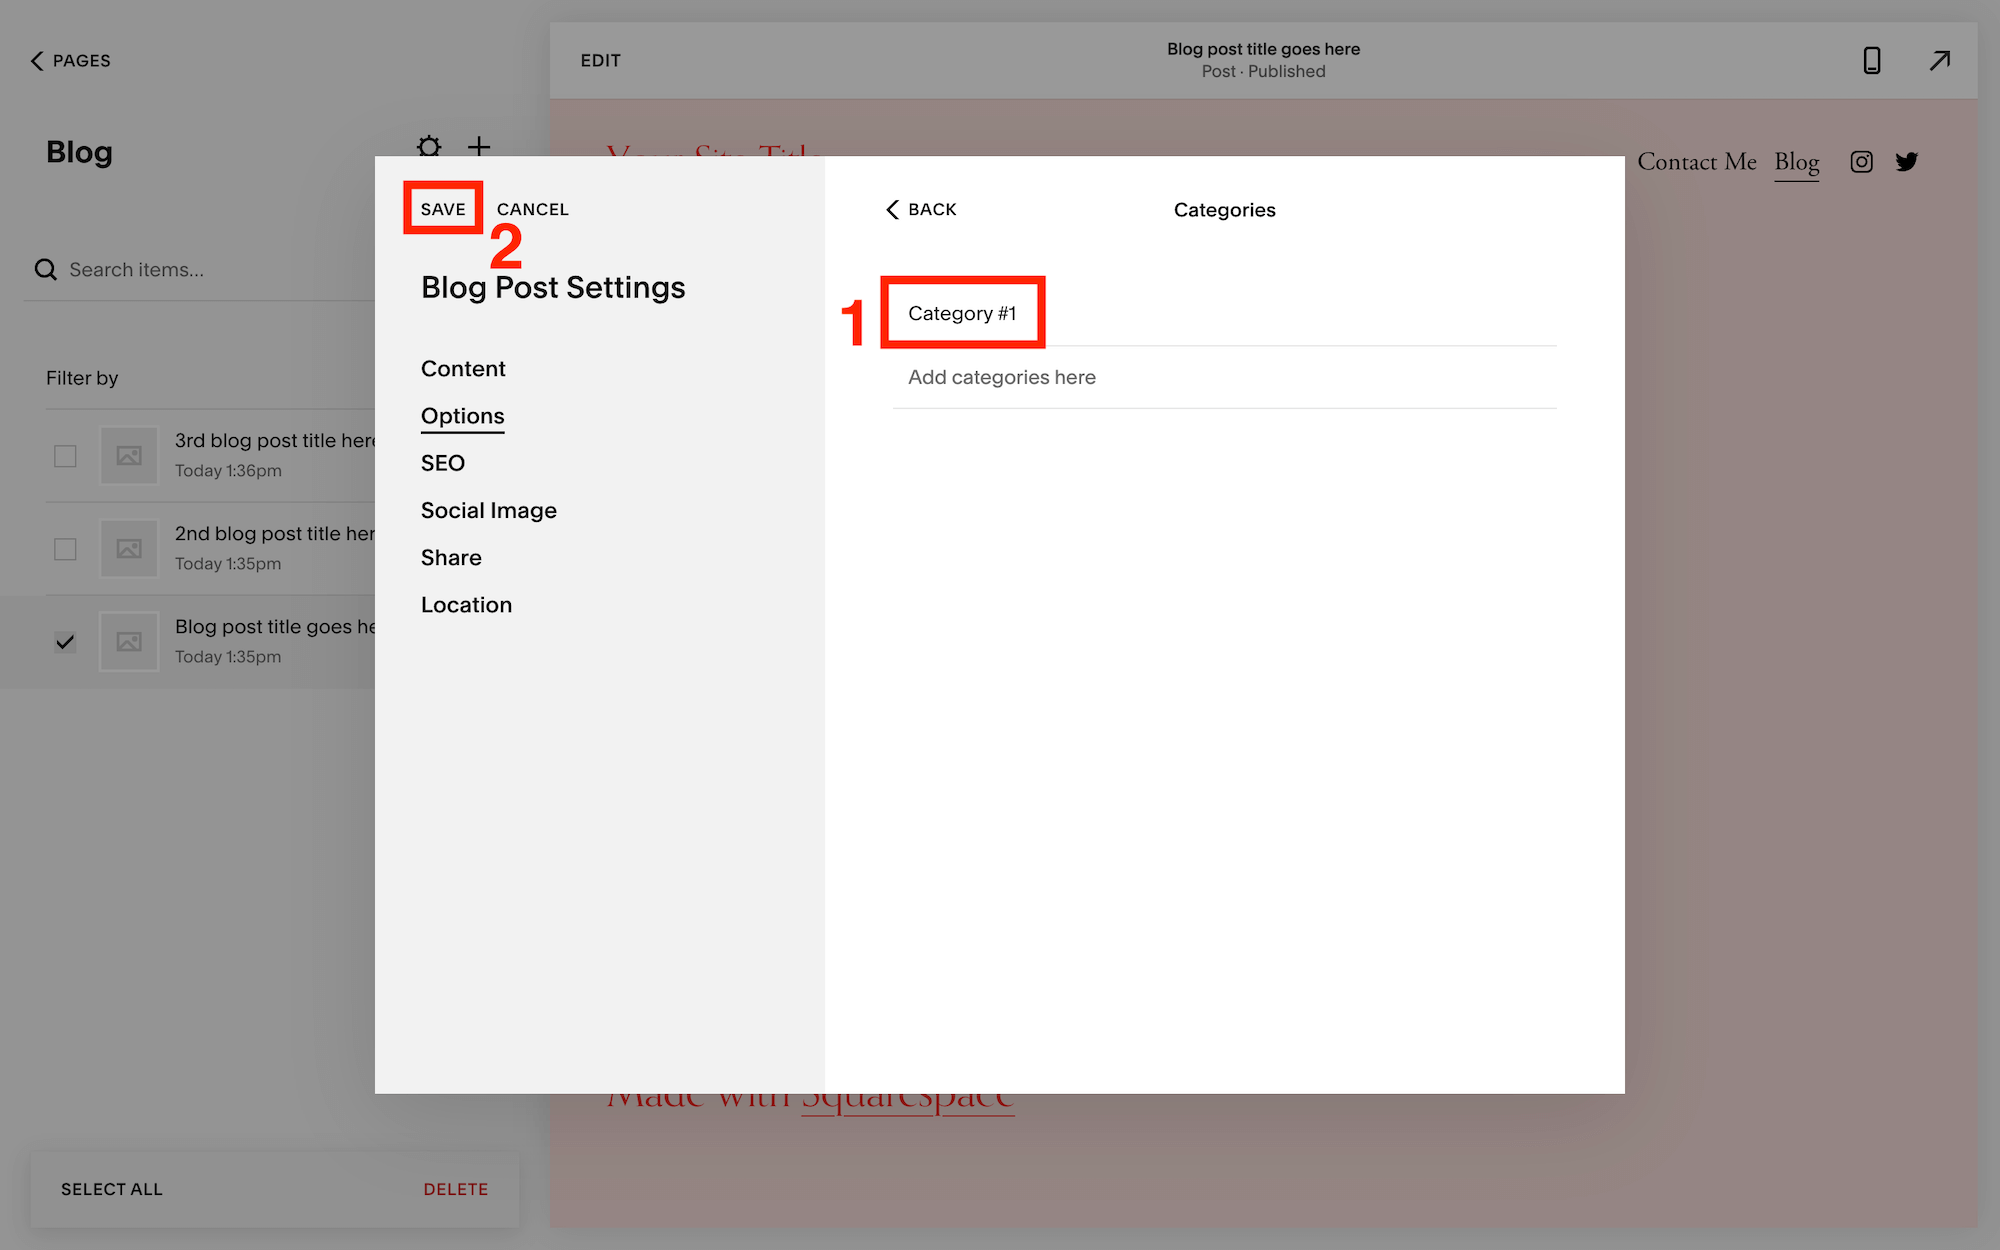
3. From this settings menu, choose “Options” from the left hand side, then click on “Categories”.

4. Type the name of your category where it says “Add categories here”, then press enter or return on your keyboard. Then click on “Save” in the top left hand side of that blog post settings menu.
5. Repeat steps #1 to #4 for all blog posts where you’re creating a new category.
6. If you’re adding a blog post to an existing category, simply navigate to the categories in the blog post settings (Select blog post > click three dots > Settings > Options > Categories), and begin typing the name of the existing category. It will then show up below where you’re typing, and you can click on it to select it.

7. Click on “Save” in the top left hand side of that blog post settings menu.

8. To edit blog categories after they’re already created, go to the blog page, and click on the gear icon beside the + sign that creates a new blog post. This will open the blog page settings.

9. From this settings menu, choose “Advanced” from the left hand side, then “Manage Categories” from the right.

10. Select the name of the category you want to change by clicking on the name, then you’ll see an edit and delete button show up below. Click on edit if you want to change the name, and delete if you want to delete the category altogether.
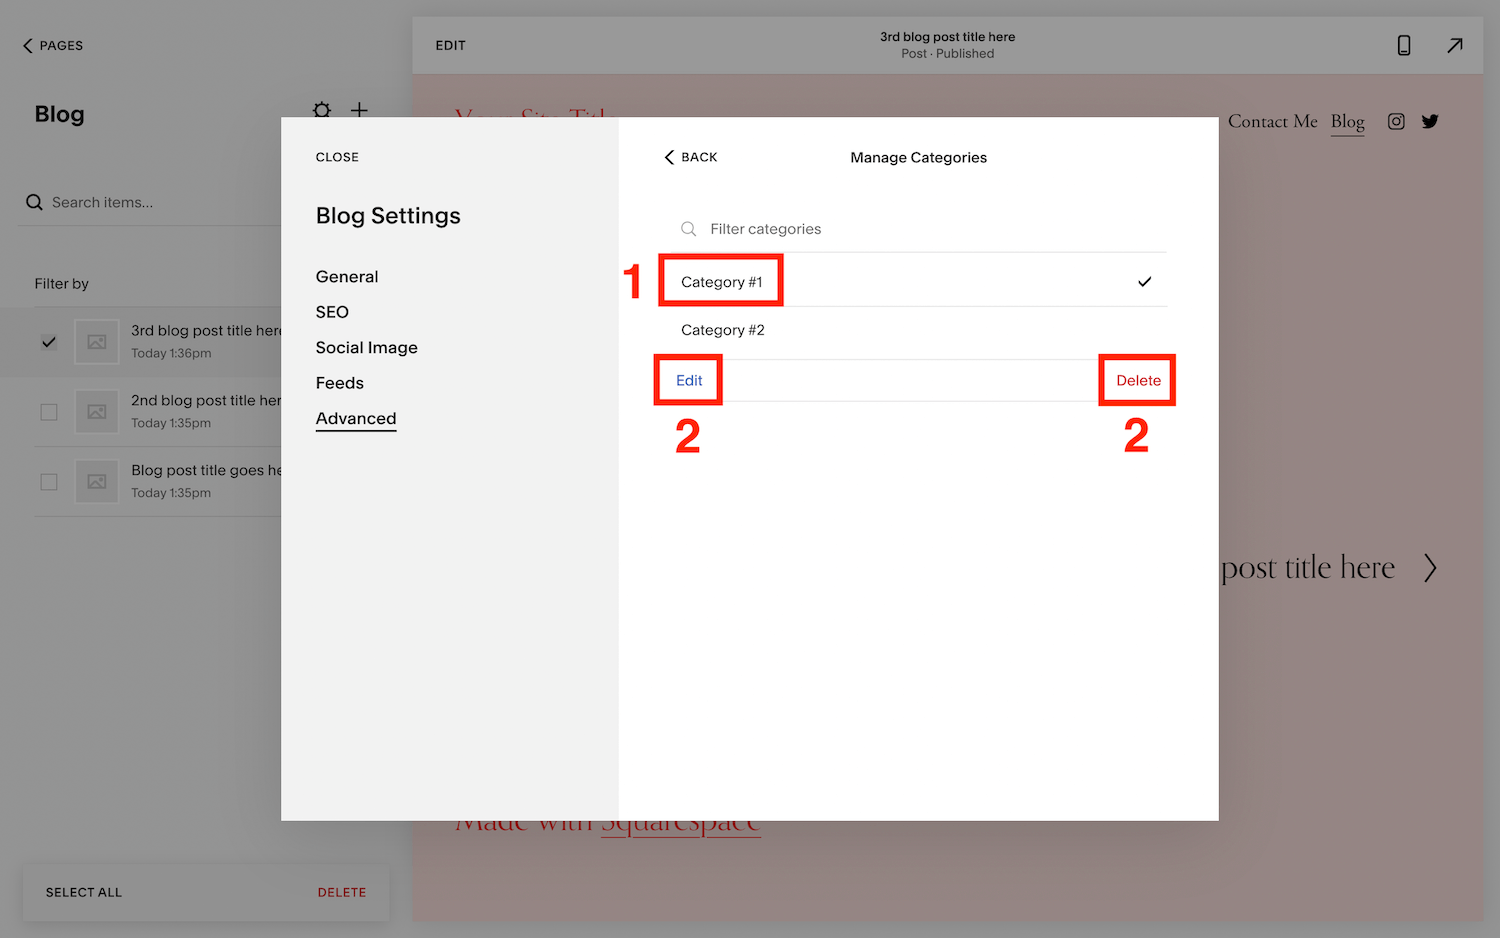
11. If re-naming the category, change the name, then click on “Save” from the upper right hand corner of that menu.

12. Click “Close” in the upper left hand corner of the blog settings menu to return to the blog page.

There you have it, everything you need to know about blogging on Squarespace. If you’ve been holding off because you weren’t confident with your tech skills, obviously you’ve got no reason for that anymore!
Blogging can be one of the best things you’ve ever done to grow your business, but you’ve got to start somewhere.
I believe in you!


