
How to make Instagram Reels (when you hate doing Instagram Reels)
This post is for anyone who doesn’t know how to make Instagram Reels, is straight up afraid or scared to make your first one (they’re complicated!), or are plain old tired of social media platforms adding more and more new features and giving “algorithm preference” to these new things that take WAY more time than other, older features.
I’m going to break down how to make Instagram Reels, including how to make NOT boring ones, ideas for non pointing Reels, and basically every step you can take to figure out how to make them easier … and especially if you feel like this 👇🏻 about them:

P.S. don’t know what Instagram Reels are? Click here to find out more about them.
Now, let me preface this by saying I still don’t get what the big deal is about Instagram Reels. I mean, if I wanted to make entertaining short videos for my business, I’d be on TikTok. But I have better things to do to build my business.
That being said, apparently Instagram is giving a “preference” to Reels, I guess, although I have yet to really see much growth from them. And that’s what it comes down to: growth.
Yes, you could make all the Reels in the world because you feel like you should, but is that really what you audience wants to see? Is it resulting in more followers, more clicks to your website, and more paying customers? Is it even attracting your ideal customers … or just random people? Who knows!
That being said, when I first started writing this post, my most popular Instagram Reel had 16,500 views. Not too shabby. Well, 6 days later, it must have gotten shared by a large account or gotten picked up by the Reels homepage, because it’s now at 42,600 views!
I’m guessing I got at least 30 followers from the takeoff of that Reel, maybe 50 max. Which is way more than any of my feed posts from the last year (my most popular post for gaining followers got 12). However, I can’t be entirely sure because I’m doing other things to grow my follower count, too, like engaging on other accounts.
That’s the problem is that Instagram doesn’t offer any insights or data on Reels yet. You KNOW that they’re collecting it, they don’t offer any feature without heavily analyzing whether it’s working or not, and for that they need data.
But to not pass on those insights to business owners? That’s just plain infuriating. I honestly don’t know how many clicks to my website or new email subscribers I’m getting, and I know that I’m getting some followers from Reels, but am I getting dozens or, like, 2? I have no idea.
So are Reels the be all, end all? No.
Nothing is ever going to be a magic bullet in your business.
What I will say is that every business is different, and you should at least try Instagram Reels to grow your business, if only consistently for 3 to 6 months.
As far as I’m concerned, Reels are Instagram’s answer to TikTok, and their attempt to try and lure users away from that platform. The proof will be in the pudding (and by that, I mean follower growth and clicks to my website), but for now we’ve just got to play the game and hope that it pays off.
That brings us to the first point:
How often should you be posting Instagram Reels?
How often you should be posting any content on Instagram has always been a mystery, but in late 2020/early 2021, Instagram spilled the beans privately to some influencers, who then shared with the public. Here’s how often Instagram apparently wants you to be posting content, and in what form:
3 in-feed posts a week (including in-feed Reels or IGTV posts)
8 to 10 Stories a week (and at least 2 a day)
4-7 Reels a week
1-3 IGTV a week (including Instagram Live)
To which I reply:

Unless you are a full-time influencer, and that is your only job, please do not put your time into making this much Instagram content … unless it’s resulting in real income for you.
That being said, you can absolutely batch create enough Reels in one day so that you can post 1-2 Reels per week consistently over a month, especially if you follow my tips below. Yes, your first Reel will take forever to make, but I promise it gets way faster after you’ve created a few.
The one thing to keep in mind that will double your effort is that when you post your Reels, be sure to turn on the feature to add it to your Feed. This way, it will count as one of your Reels AND one of your posts for the week, plus this will give it more longevity and exposure.
Do you even have access to Instagram Reels?
Not every country has been given access to Reels from Instagram. As of writing this, they’ve opened up over 50 countries (including the US, Canada, and Australia), but many other countries don’t have them.
To find out if you have Reels or not:
Go into your Instagram app, click to your own profile, and click on the plus sign in the top right corner.
Reel should show up as an option for content that you can create.

If you don’t see the option to create a Reel, make sure your Instagram app is up to date. To double check, you could even delete your app and re-download it.
If you’ve done all that and it’s still not showing up, chances are that Instagram Reels are not available in your country yet.
Now we come to the most important question:
Do I have to create those stupid pointing Reels?
Bahahahaha, the answer is NO! And this is probably the #1 reason why people don’t want to create Reels, because they think they have to do pointing ones and be made fun of by everyone else who makes fun of pointing Reels.
While it might seem like the easiest ways to create an Instagram Reel is to point at some text, that is absolutely not the only way.
Also, doing what everyone else is doing is rarely the way to stand out and go “viral”.
Here are 5 ideas of Reels you can make that don’t involve pointing, and 4 don’t even involve you needing to be on camera (!):
#1 Make a Reel using Canva + GIF’s
I used this method for a Reel to promote my Brand, Build, Blog course launch in November 2020. Being able to pull GIF’s directly into Canva is SO easy (keep scrolling for all my tech secrets ;).
The only thing I’d do differently now is to add a call to action at the end, as I’m pretty sure most people don’t read Reel captions.
The second one is just a straight up single meme with some text over it. Super simple, and if the meme and your quote are hilarious, these can take off like wild fire.
#2 Share an “auto-typing” quote or text animation in a Reel using Canva


Truth be told, I haven’t shared a Reel like this on my own account or seen it on anyone else’s, but this is a way of taking a simple quote image (that people love to share already) and taking it to the next level … and in a Reels form that Instagram is giving algorithmic importance to right now.
You might need to experiment on your own account to see if your audience prefers sharing a regular image quote OR a Reel form like this more, but it’s worth trying out (and doesn’t require you to do your hair and makeup to be ‘camera ready’).
Plus you can overlay music or even you saying the quote if you use a Reels format (they recently introduced a voiceover feature). The creativity is endless! This would be a great idea if you sell audio based products, such as meditations or affirmations, or have a published book that you can share quotes out of and read, much like an audiobook.
#3 Lip Sync to an audio clip from your favourite TV show, movie, or influencers
This is one of my favourite things to do! Yes, this works only if you’re on camera because you’re trying to sync what you’re saying to the audio, but it always makes for an engaging Reel.
You relate this back to your business with the little caption you overlay on top of your video.
In my experience, people rarely read the captions you write underneath your Reels, so keep any call-to-actions in the text that you overlay the Reel video itself.
I see these as being more shareable content that will get you more followers and possibly clicks to your website, maybe some saves, but not necessarily tons of comments.
#4 Share testimonials or before and after images
No matter if you work with clients or sell products, you can get some sort of testimonials, reviews, or feedback from customers to share as social proof, and you 100% should be sharing that regularly on Instagram!
Of course you could share it as a regular feed post, but how boring is that?!
Here’s an example of a testimonial Reel that I used during my Brand, Build, Blog launch, and yes, I specifically picked that song because my ideal client would most likely remember it from slow dances in high school (😂):
Here are some ideas on how to use a Reel for before and after images or transformations:
show the before and after photos of your client’s weight loss, skin changes (i.e. getting rid of acne), or any other obvious physical changes
help them to choose the right skincare, apply makeup more effectively, or choose clothing that flatters different body shapes
show home makeovers, cleaning up your house (with or without non-t0xic cleaners 😉), or showing that #momlife (if your ideal client is Moms)
web design before and afters
going from separate ingredients to a finished recipe
Here are a couple examples (the second Reel actually uses the “snap” makeover song that is perfect for showing transformations):
#5 Share program or product features
Have a program or online course with lots of features? Can you use one of your products in a dozen different ways? Help push your future customers over the edge of buying by showing them everything that’s included in their purchase!
Here’s an example from my Brand, Build, Blog course:
I could totally see this as an image of your product (essential oils, skin care, cleaning products, literally anything) where you overlay text that changes every few seconds and gives them ideas on how they could use it.
Here’s an example (created in Canva):
Again, remember to put any relevant call-to-actions in the Reel itself, as I find most people (myself included) rarely read captions on Reels.
Alright, now that I’ve given you lots of ideas on how to make Instagram Reels … how do you actually make them?! This is what’s holding most people back! So let’s get to it.
How do I add music or audio to Reels?
Having some great music or lip syncing to audio is where Reels truly shine, but how do you find the songs or audio clips?
Finding songs on Instagram for Reels
Finding songs is pretty easy, as long as it’s already in Instagram’s music catalogue. Of course they don’t have every song on the planet, but there’s enough that you’ll find something you and your audience will like.
Don’t record a song from somewhere else, as that’s copyright infringement and your Reel could get taken down, which is the last thing you want to happen if you’ve spent time and energy creating something.
Here’s how you find and add music to Reels (and please excuse the screenshot of my blanket:
Go in an create a Reel (following steps above)
Click on the music note to add music.
Search the library to find a song.

4. Click the play button on the right hand side to preview a song, and click over the album art or name to use it.
5. Adjust what clip or section of the song you want to play by putting your finger over the white section at the bottom and dragging it from left to right.
6. Once you’re happy with the clip you’ve selected, click done in the upper right hand corner.

7. Record your video content for the Reel.
FYI: you can change the length of your Reel from 15 to 30 seconds by clicking the button above the “Add audio” button on the Reels menu. It’s the one that says “Length” when you first enter the Reels creation screen on Instagram.
Finding Audio to lip sync to
This is a little bit more challenging, but easy to do once you get the hang of it. You won’t necessarily see audio clips in the audio search engine, you have to go find a Reel that uses it so you can use the “Use audio” function.
Many of these audio clips have been imported from TikTok or other platforms, which is why they’re not in the music catalogue. Also note that if you ever make a Reel that uses audio from a Reel that gets removed from Instagram, your Reel will magically disappear as well.
Here’s how you use audio clips from an existing Reel:
Find a Reel you want to use the audio from. I highly recommend saving any Reels you like the original audio from as soon as you see them, because chances are you won’t be able to find it when you want to use it.
At the bottom of the Reel, where the audio title is shared, click on that.
This will bring up any and all Reels that have used that audio as well. Feel free to look through a few of these to get some ideas of how else you could use it!
Click on the “Use Audio” button at the bottom of the screen.
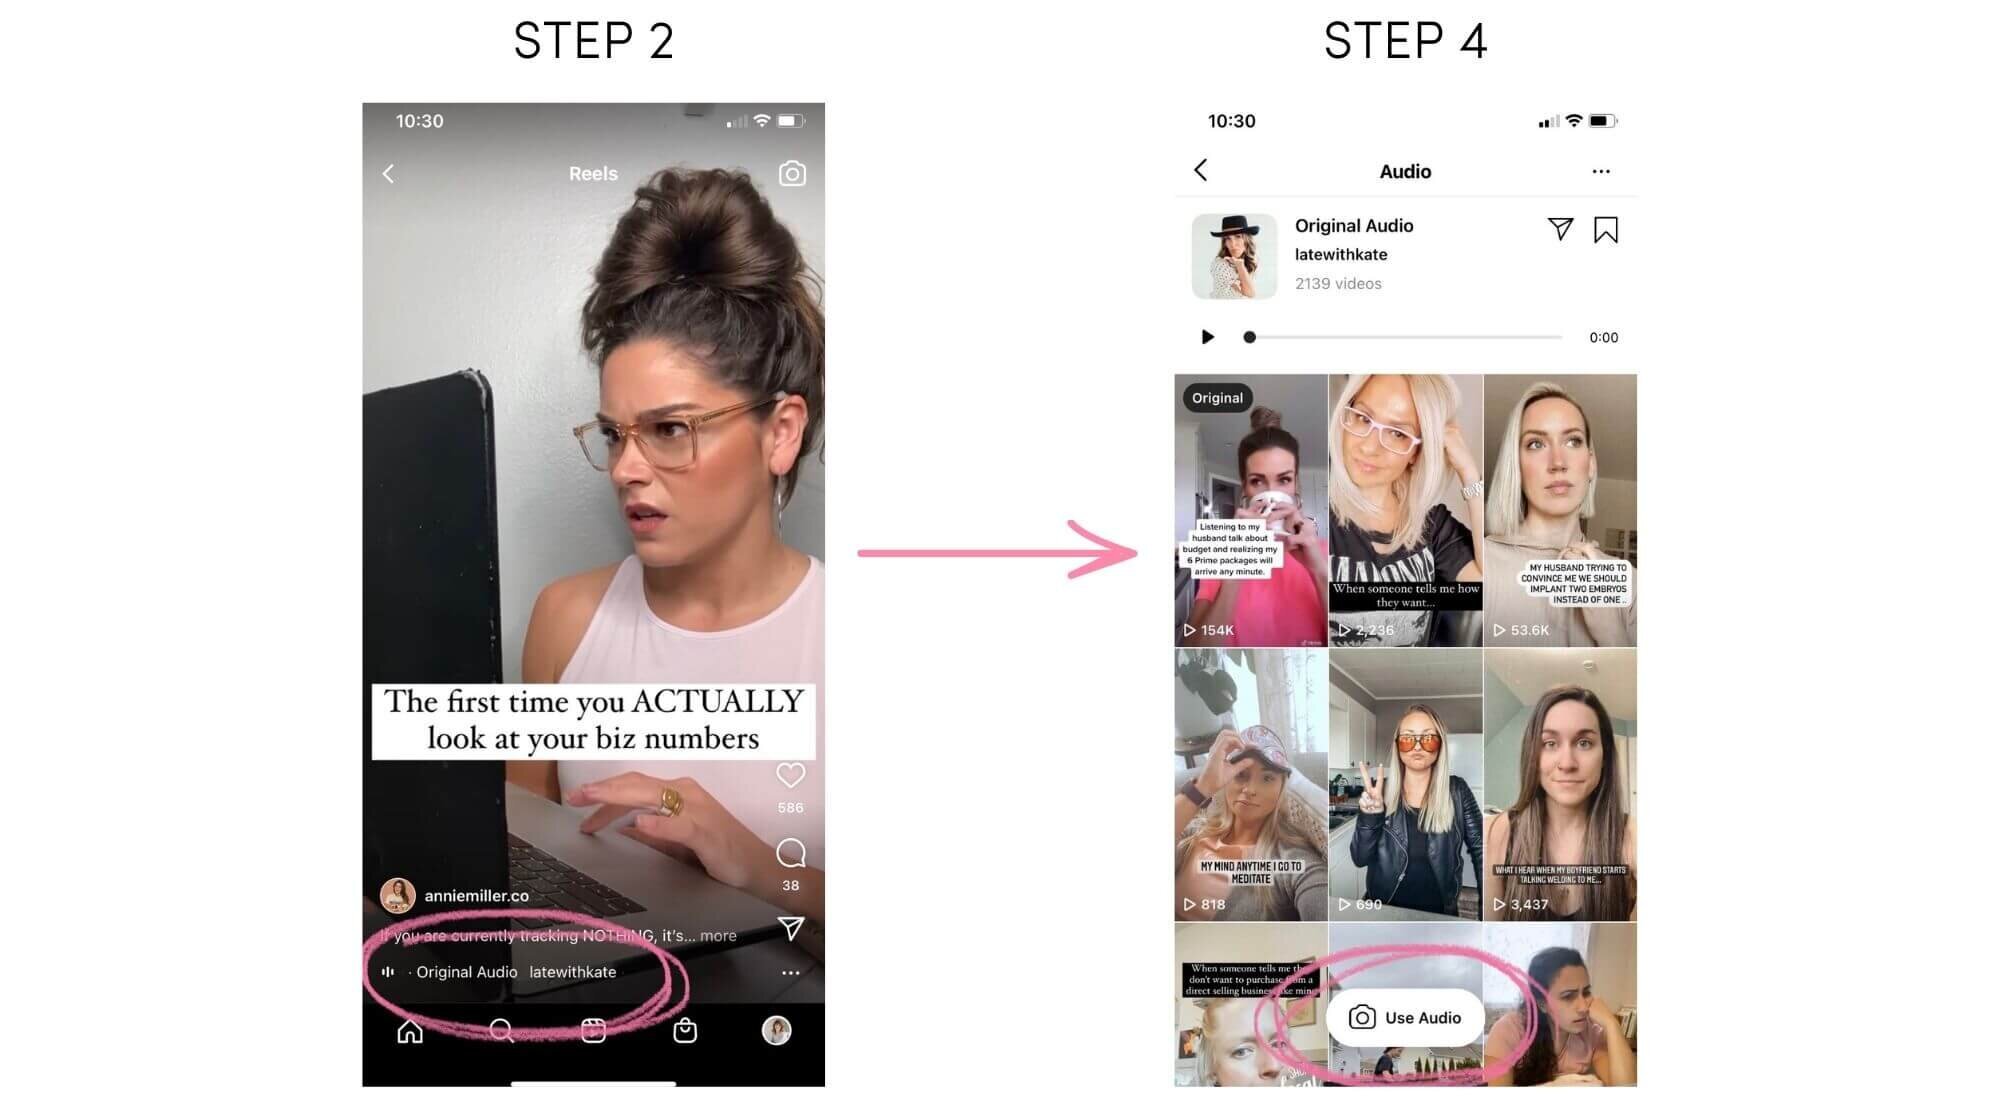
5. This will bring up the Reels creation screen where that audio clip will be preloaded. You can now record your Reels video!

If you’re doing lip syncs, be sure to use a super useful feature that I didn’t discover until a few weeks ago, which is the countdown timer.
The countdown timer allows you to click on the record button, then it’ll countdown from either 3 or 10 seconds to let you get in position before it starts recording the video clip for the Reel. This allows you to not have your arm outstretched at the beginning, which is distracting.
Here’s how you use the countdown timer:
When you’re in the Reel creation screen, the bottom button the menu is the timer button. Click on that.
It will bring up the timer menu where you can click on the length of the countdown to change it between 3 and 10 seconds, then click on set timer to exit this menu.

3. When you record the Reel clip, it’ll count you down on your screen, at which time it’s not recording yet.
And just so you know, it’s totally normal to have to do 10+ takes of lip syncing Reels so that it matches up just so, otherwise it’s not as impactful. Normally I’d say get it done and get on with your day, but this is a case where doing it “right” really matters.
How do I get ideas for Reels?
This is a hard question, since this all comes down to creativity.
The easiest way, for me, is to re-create what I’ve seen already done by others. It’s boring, it seems like you’re copying, but if you’re creating your own original content inspired by someone else’s, that’s exactly how TikTok and Reels basically works!
Now, if you have your own amazing, original idea, by all means, use it! But if you’re stuck, try this:
Go to your profile page and click the + sign in the top right hand corner, then click on Saved.
Click on the + sign in the top right hand corner.

3. Name your Reels folder and click “Next” in the top right hand corner (psst: I also have a folder for post ideas, too. Just sayin’).
4. Select which Reels are already in your overall saved folder that you might want to add, then click on “Done”.

5. As you’re scrolling through Instagram (which we all do), add any Reels that you find funny, interesting, or inspiring to that folder. But here’s a glitch in Instagram, you can’t add to saved folders when you’re viewing within Reels. You have to go to the person’s main feed, find where they shared the Reel to their feed, and then save it to that folder from there.
If they haven’t shared it to their feed, you can absolutely still save the Reel, it’ll just be added to your overall “saved” folder, which includes everything you’ve ever saved on Instagram to any of your saved folders. Good luck finding older ones.
6. When you’re ready to batch create your Reels, navigate to your saved folders from your profile page (using step 1 above), and click on your Reels folder.
7. Browse through all your Reels and pick the 8-10 that you’re going to create all in one day.
8. Book your Reels creation day in your calendar, and just do it already!
I’m not going to lie, my brain is wired for creativity and I get Reels ideas all the time, especially when I’m listening to music. I listen to a line and think to myself “that would be perfect for a funny Reel about selling/marketing/blogging/etc”.
What I do next is open up Instagram to see if that song is in the music library. If not, I don’t worry about it.
But if the song is in the library, I go into the Notes app on my phone, write down the name of the song, the line that I’m thinking of, and then an idea of how I can relate this to my business (i.e. most likely what’s written as the caption in text on the Reel).
I save all these ideas in a folder called “Reels ideas”. Just like on Instagram, I also keep a running document for “Post ideas”, where I write down streams of consciousness and thoughts I have while not working, which always come to me when I’m in the shower!
Do I have to create a cover for my Reels?
Short answer: no! I’ve noticed a trend on Instagram of less curated and perfect feeds, so just pick the nicest screenshot you can find from the Reel itself (I’ll show you how to do this in the tech tutorial below).
However, if you’re design obsessed like I am (aka perfectionist graphic designer), putting up a Reel where the aesthetic doesn’t 100% match my brand drives me crazy. In most of my Reels it’s me facing the camera, and I may or may not be wearing an outfit that matches my branding. So in a screenshot from the Reel that’s been chosen for the cover, I have these pops of colours that clash with the rest of my brand.
Personally, that puts me on edge (I know, I know, there are so many bigger issues with the world, but I’m a design control freak, what can I say?), and I was deleting Reels from my regular feed, which wasn’t helping them gain exposure in the weeks or months that followed. For these reasons, I’ve just started using Reels covers this month.
Just like much of my social media, I chose to spend a little bit of money on a Reels covers template from Creative Market. The $27 US that I spent saved me hours of time.
Here’s the Reels Canva template I bought (that I also used for IGTV covers during my last launch), but you can also just search for “Reels covers” for other options.

How to create your first Instagram Reel
The time has come to do the damn thing: create your first Reel 🙌🏻💃🏻
It can feel overwhelming, and the screenshots above will only take you so far.
Let me take you through the screenflows using my own phone while I create actual Reels in this tech tutorial all about how to make Instagram Reels.

In this tech training, I teach you:
how to create an educational Reel, including adding text
more easily make a lip sync Reel to an audio clip without taking 2 hours
Canva secrets to creating hilarious Reels using GIFs
how to create animated quotes in Canva and use it as a Reel
how to overlay your voice on top of animated quotes or screenshots
how to create a Reel that shows off all the features of your paid programs or services
I’ve spent hours working out the kinks in creating Reels so that you don’t have to!
JUST FILL IN YOUR INFO BELOW TO GET MY tech training “how to make instagram reels (when you hate doing instagram reels)”!
The big question now is: are you ready to create your first (or next) Reel?
You’ve got to just jump in with both feet, the water is fine! Nothing horrible will happen, I promise.
The only way to to get comfortable with doing Reels is to do them, there are no secrets.
Feel free to share your next Reel and tag me (@ashleysrokosz) so I can share it to my stories and celebrate with you!


